Wednesday, July 31, 2013

Brambly Hedge

Want to see a fun card I made using the Brambly Hedge Papercrafting Collection Triple CD-ROM SET
from Crafter's Companion

 
All I had to do was print out the pages for an Easel Card and all the bits were right there ready for me to put together.  I just trimmed them all out and then put them together.   I added some green cardstock, twine and buttons from my stash to finish it up.  Easy peasy!
 
I just think these little mice are the cutest things and I just had to share with you!
 
Thanks for stopping and looking today.  Until next time...happy scrapping!
 
Stacy


Thursday, July 25, 2013

Christmas in July at Crafter's Companion

Hello everyone!  This week Crafter's Companion is "officially" celebrating Christmas in July.  They have opened the doors to their Christmas store and you are seriously going to want to check it out.

I'm pretty happy to have gotten one of the new Die'sire holiday Embossalicious embossing folders - Christmas Patchwork and I used it on the card I am sharing with you today.  Isn't this folder gorgeous!? 


I trimmed the base card out of Luxury Centura Pearl Printable Snow White Cardstock.  And then layered some pattern paper and then the embossed paper. 
 
I pulled out some paper from my stash and trimmed out the Christmas ornaments to use as embellishments.  I recently purchased some Bakers Twine from Tim Holtz at my LSS so it was sitting right there on my scrap desk just calling my name. ha 
Have I mentioned lately that I love my Crafter's Companion Ultimate Tool?!  Seriously, I do!  You can do a million things with this beauty but one of the best things about my Ultimate Tool is the bow maker.  And guess what?  This card needs two bows!
 
So of course I grabbed it and got out the pegs from inside of it and set them in the smallest holes since I wanted very small bows. 


Then I just wrapped the twine around the pegs, slipped one end under the twine in the middle and tied a knot.  


Slide it off the pegs and you have a perfect bow!  And as you can see these would work perfectly on my card. (if I was using green! ha)

 
Crafter's Companion will soon be launching some FANTASTIC holiday sentiment stamps called ironically Sentimentals (hehehe).  I used one on this card by stamping it out with Memento Ink in Tuxedo Black onto a scrap of the patterned paper that had been using and trimmed it into a banner shape. 
 
I added it to the card with double sided adhesive squares and finished it off by making some Pearls  on the sentiment banner with my Viva Pearl Pen.  I also just had to add a bit of this luscious stuff to a couple of snowflakes on the embossed paper to make them stand out.  And since I'm addicted to sparkle I put a little Star Dust Stickles on the ornament embellies. 
 

I like how it turned out.  How about you?  Thanks for stopping and looking today.  For more Christmas inspiration check out the Crafter's Companion Facebook page or website.

Saturday, July 20, 2013

July Crafter's Companion Die Cut Challenge

Have you joined in on the July Die Cut Challenge at Crafter's Companion this month?  Well, if you haven't you still have time.  Here is my take on the challenge for this month.


I made this card by using only scraps left out on my desk after I made another project.  I love to do that. 

And since I have been an embossing fool lately, I just had to run the base card paper through my 6" X 6" Embossalicious Embossing Folder - Petite Dot.  This folder is obviously too short for the size of paper I ran through so I added the striped paper to the bottom.  I added the ribbon to tie the two together.  You will notice that I pulled out one of my Martha Stewart edge punches to use also because the scrap of striped paper was too short to go all the way to the bottom.  I was only using my leftover scraps remember?  (smile)

To finish things up I stamped out in Memento Ink - Rhubarb Stalk the Happy Birthday sentiment from the Stamp-It Australia EZMount Stamp Set 61 - Sentiment Swirls.  I die cut it out and added it to the front of my card with Double Sided Adhesive Squares for a little extra dimension.

Now it's your turn.  Go and get your challenge project made while you still have time to win the awesome $30 gift certificate to the Crafter's Companion store!  Until next time...happy scrapping!

Thursday, July 18, 2013

Want To Win a Prize?

Help me win an fantastic prize by LIKING the Crafter's Companion USA facebook page and telling me you did it. The Design Team girls are having a little friendly competition! 

 https://www.facebook.com/CraftersCompanionUSA?ref=br_tf

If I win the fab prize, I will randomly pick a person from those that let me know they did this and will send that person a fab prize!

So help a sister out!!!!  lol

Stacy

Tuesday, July 16, 2013

Christmas in July with Barkley

How about a little Christmas in July?!  It seems like this is the time when all good little crafters start working on their holiday projects so here is my first Christmas card of the "season".  It was easy to be inspired to make it because I have been having so much fun with that Barkley CD-ROM that I received last week.  And starting tomorrow you will be able to get one of your very own to enjoy!!


This card went together so quickly and I know that if you are anything like me you don't have a ton of free time so any time I can make something great in a short amount of time I'm thrilled!

To make this I grabbed some Kraft paper and cut out my card base and scored it on my Ultimate Tool.  Then I printed out my sentiment sheet and the topper sheet and trimmed out the ones I wanted to use.  I inked the edges and added them to the card base with double sided adhesive squares.  I finished up with a little Star Dust Stickles and Liquid Pearls....(I told you I was addicted to them! ha)  Voila!   All done.   

Thanks for stopping by and looking!!  Until next time...happy scrapping!

Stacy

Saturday, July 13, 2013

Barkley Sneak Peak and Tutorial

Hi there!  Don't tell anyone but I am going to be a bit sneaky and show you something special that isn't out yet but is coming very soon.  SHHHHHH......


I was lucky enough to get a new CD-Rom to play with and it features our newest addition to Crafter's Companion collection...Barkley!  Total adorableness! (yes, I know that isn't a word but it should be!!! ha) (wait...maybe it is a word since it didn't get corrected by spell check!! ha)

Just wait until you can get your hands on the fantastic stamps or the awesome CD-Rom which is FULL of so much scrappy goodness you will be crafting forever!  ha

I decided to play with the CD-Rom first and let you follow along.  I made an Exploding Birthday Box.


First I printed out the 3 pages of the Exploding box
 
Then I cut out all the pieces.  I did this while watching TV and it went really quickly.
 
I went ahead and put the lid together first since it was going to be quick and easy.  I pulled out my Ultimate Tool and scored the edges.  Next I flipped it over and put some glue on the 4 tabs.
 
See the glue on the tabs?  This is the top of the lid.
 
I fold it and then I used paper clips to hold the sides together while the glue dried.
 
 
I inked the edges of the topper I had already trimmed out and then glued it down to the top of the lid.  To finish off the lid, I trimmed out a small tag and then stamped out a sentiment from one of the Barkley stamp sets.  I added it to the top of the tag and finished it off with a small flower.  I glued this to the top corner of the lid. 


Now let's make the Exploding Box...  This is so easy once you have all the parts trimmed out.  First I used my Ultimate Tool and scored the sides.  Then I inked the edges of the coordinating squares and adhered them to all three sizes of the box shape.
 
Inking edges
 
Adhering squares.
 

Adhered inked squares to the back of the scored box shape.
 
Now I glued each graduating box shape on top of each other starting with the medium size one onto the large size and then the small one on the medium one.  I added a few flowers to some of the sides with double sided adhesive circles.
 
I finished up the box by printing out a sentiment sheet and trimming one of the sentiments to fit in the center of the box. 
 
Here is what it looks like when you bring up the sides of the box and put the lid on them.  When you take off the lid, this is what it looks like:
 
 
Thanks for stopping by today and following along.  I know you have to be as in love with Barkley as I am so keep your eyes peeled for his launch in the Crafter's Companion store on July 17th.  Until next time...happy scrapping!!
 
Stacy


Sunday, July 7, 2013

Miss Me?

Hello! Did you miss me?!
Hoover Dam
 

I'm in Oklahoma visiting after being on the road for almost two weeks.  My mother and I loaded up 4 of my kids, my two dogs and hit the road in my RV.  We visted the Hoover Dam, the Grand Canyon, Meteor Crater, the Lowell Observatory, the Petrified Forest and the Painted Desert and many other places along I-40 on the way from Nevada to Oklahoma.  We had a blast!

Lake Mead Recreation Area in front of our RV parking spot.
 

Train to Grand Canyon

Grand Canyon
 
Meteor Crater
 
My silly son, Jesse.
 
The Super Moon
 
The kids riding banana bikes.


It is a little harder to find time to scrap here because we are so busy being social! ha  But I did manage to squeeze out a little time to make a card to share. 


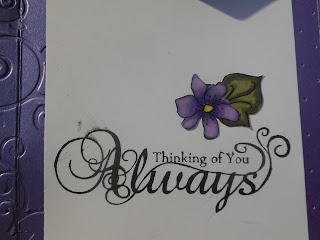
I borrowed my Mother's eBosser and grabbed my Craftwell embossing folder - Magic Celebration to start.  I used some luscious purple pearlescent card stock as my card base.  This embossing folder makes a tri-fold card. 

I stamped out the Violets from the Sheena's Floral Fantasy EZMount Stamp Set - Violets.  Then I colored them with my Spectrum Noir Markers.  I used LV1, LV2, LV3, DG2, DG3, DG4 and CT3. I trimmed out the colored image and layered it on some green card stock.  And then added it to the front of the card.

I'm loving Liquid Pearls right now.  I know, I know...I'm a little behind the times.... ha  But I've just started using it and I'm on a roll.  I added a bit of Silver Pearl to the top and bottom of the colored image.  And I made a sweet little green velvet bow on my Ultimate Tool to add also.


On the inside of the card, I added some white card stock and then stamped out my sentiment in the center.  I used a stamp from Sheena's A Little Bit Sketchy EZMount Stamp Set - Only Words - From The Heart.  I fussy cut a flower and leaf that I colored with my Spectrum Noir markers from the same Sheena Douglass -Violet's stamp set and added it to the inside near the sentiment.