Tuesday, January 8, 2013

Stamp It Australia Sneak Peak

I mentioned yesterday that Crafter's Companion was launching a gorgeous new Stamp It Australia stamp collection at CHA in a few days.  Well, I'm happy to share a little sneak peak of one of the stamps here on my blog today.

The stamp I used is from the Spring set and it is a beautiful dragonfly.  I stamped out the image and colored it with my Spectrum Noir markers.  I only used a few - BT2, BT4, JG1, CR1, CR3.  After I colored the image I fussy cut it out and added Star Dust Stickles to the wings for a bit of sparkle.


I pulled out some Kraft paper and made a 6" x 6" card base using my Ultimate Tool.  Then I grabbed my new Graphic 45 -Birdsong paper pad and layered both sides of Cherry Blossom onto the Kraft base.  I stamped out a Happy Birthday sentiment from the same set and made it the focus of my card by matting it with the Cherry Blossom and Kraft paper.  I centered it on the card and used dimensional adhesive squares to adhere it.


When the Stickles dried on my dragonfly, I used the same dimensional adhesive squares to adhere it to the card.  I just cut up a square to fit under the body of the little cutie.  I pulled some pearls out from my stash and made a whimsical flight trail across the card.

I like it and I hope you do too!  Please go check out some more sneak peaks on the other Crafter's Companion DT blogs.  You can find the links on the sidebar at Crafter's Companion.  And there should also be a few peaks on the Crafter's Companion Facebook page.  This is a really awesome stamp release.  You are going to want to add most if not all of these to your stamp collection.  I know I will be! 

Made it Home

Hi guys.

The boys and I finally made it back to Nevada last night.  We were supposed to leave on Friday but one of my son's (Jesse) got sick and after an Urgent Care visit where the doctor diagnosed a stomach virus, we ended up stayed another two days.  He was just too sick to be stuck in the car for two days.

He is feeling better now and our trip was uneventful.  So all is good.  I guess we are back to the real world now. 


I made a layout for a new January Winter Wonderland Challenge at Sketches4all. I'm also entering it at Party Time Tuesdays in their sparkle and Shine challenge because this thing is blinding!! lol

I used a photo of my boys from our trip driving TO Oklahoma for the Christmas break.  We stopped to walk the dogs in Flagstaff and there was snow everywhere and the kids just started playing in it.


I actually ended up making two layouts with the photos from that stop.  The other one is for the So You Think You Can Scrap Challenge at Colorful Creations. I'm also entering it in two challenges at Sketches4all - Jessica's Challenge and Lisa's Challenge. And in the Something Old, Something New challenge at our Daily Bread.  The old is the Rik Rak that I have had for years and the new is the paper that I bought last week. 

Here are a couple of close ups:


I had fun making both of these layouts and they are fitting nicely into my New Years Resolutions to Make More Layouts.
 
Crafter's Companion is launching a new set of Stamp It stamps during CHA that are to die for!!  We will be showing sneak peaks this week.  I will have one to share with you tomorrow.  If you can't wait you can check out the CC facebook page or some of our other design team members.

My 5 year old is having surgery on her eyes this Thursday so I'm a little squirrely right now.  She is having strabismus surgery on both eyes.  (lazy eye)  Wish us luck!!


Wednesday, January 2, 2013

Happy Wednesday!

Hello all,
Just a reminder that you have 1 more day to submit your creation for the
December Sketch Challenge at Sketches4all! There are two great prizes
up for grabs and the winners will be announced on January 7th.
This challenge ends January 3rd at midnight EST. Here are the details for
 
here is the layout I made for it.
 
 
Also Sketches4all will be starting a Winder Wonderland challenge on January
7th and there is a fun Multi-Media prize for the winner from Creative Inspirations.
  It will be a sketch challenge that you will be able to find in the Forum so come
check it out.  HERE


If you are interested in wowing us next month with your fabulous creativity
come on over and check out the details.
 
I just wanted to catch you up on all that is going on at S4A. 
Now how about some more news?  I'm happy to announce
 that I am continuing on for the next term with Crafter's
Companion!!  They askedand I happily
  said yes!  So expect even more projects using awesome CC products! 
We recently got some new stamps that I am dying to show you but it
will have to wait for now...very hush...hush!!  ha  You are going to
 LOVE them!
 
Crafter's Companion will have a new January challenge up today
 (hopefully soon) and it is Anything but a Card.  Go check it out
when you get a chance.
 
There is a lot of scrappy stuff starting up.  I hope you all have your
 mojo ready to go!! ha
 
On a personal note, my hubby and 3 of my kids are getting ready to
fly home today and my older two boys, dogs, presents and I leave to
drive back on Friday.  It has been a fantastic trip to Oklahoma and we
 have enjoyed all the time spent with friends and family.  Kids are
back to school on Monday....so I guess our holiday is almost over. 
 
Enjoy your Wednesday!
 
Stacy


Tuesday, January 1, 2013

Happy New Year!!

Happy New Year!!  Here's to a fantastic and scrappy 2013!!


Tuesday, December 25, 2012

Merry Christmas From My Family To Yours!!

Merry Christmas from the Watson Family!! 
(If you don't celebrate Christmas then just have a great day!) 
 
 
I know it is a holiday and most folks are spending quality time with their family so I really appreciate that you stopped by to visit today.  I'm going to put up a couple of "oldies but goodies" to help keep you in the mood.  All of my "oldies" were projects made with Crafter's Companion goodies, so as a holiday gift to you, Crafter's Companion is giving away a stamp set on their blog today.  If you are interested in winning the stamp set they are giving away, you can go to Crafter's Companion today and leave a comment on the post for a chance to win.  Please go and leave a comment if you have time.  I would love it if you won something! 
 
Here is a card I made using the Humphrey Xmas EZMount Stamp Set - Christmas Wishes(I just love the colors on this card and of course I love little Humphrey too!!
 
 
Here is the card.
 
Here is a close up look.

Here is the inside.


How about this basket I made using my Sheena Douglas Paint Fusion Holly set?  I stamped and painted the holly and then fussy cut it out.  It just was perfect on this basket project! (and fun to do! ha)
 
Here is the basket.

Here is a close up.
 
There you have it two oldies but goodies that should help to keep you in the holiday spirit!!  Remember to go over to Crafter's Companion right now and leave a comment on the post for your chance to win a stamp set!! 
 
Thanks for stopping by today.  Enjoy the rest of your holiday!!
 
HUGS!!!


Tuesday, December 18, 2012

Who's Interested in a Tutorial?

Hello!! I must admit I am a big admirer of all of the Crafter's Companion instructional DVDs. (Seriously!)   It is just so much fun to follow along with Sara as she walks you through a project step by step. She always makes it pleasure and even when it seems like a project might be complicated, she shows you that you can do it!

For my project today, I pulled out my Ultimate Christmas Project DVD and made a Pulley Slider Card. These cards are really easy to make and super fun. Kids especially love them. Here let me walk you through making one.

You start with a piece of paper 11" x 6" paper. Pull out your Ultimate Tool and butt the 6" side of your paper up against the handle and score in the Trifold US Letter line. Flip your paper and score again in the same line on the opposite side. It will look like this:

Now you will open up your Ultimate Tool to the Box Making board. For this card we are using the Box Lid side of the board.

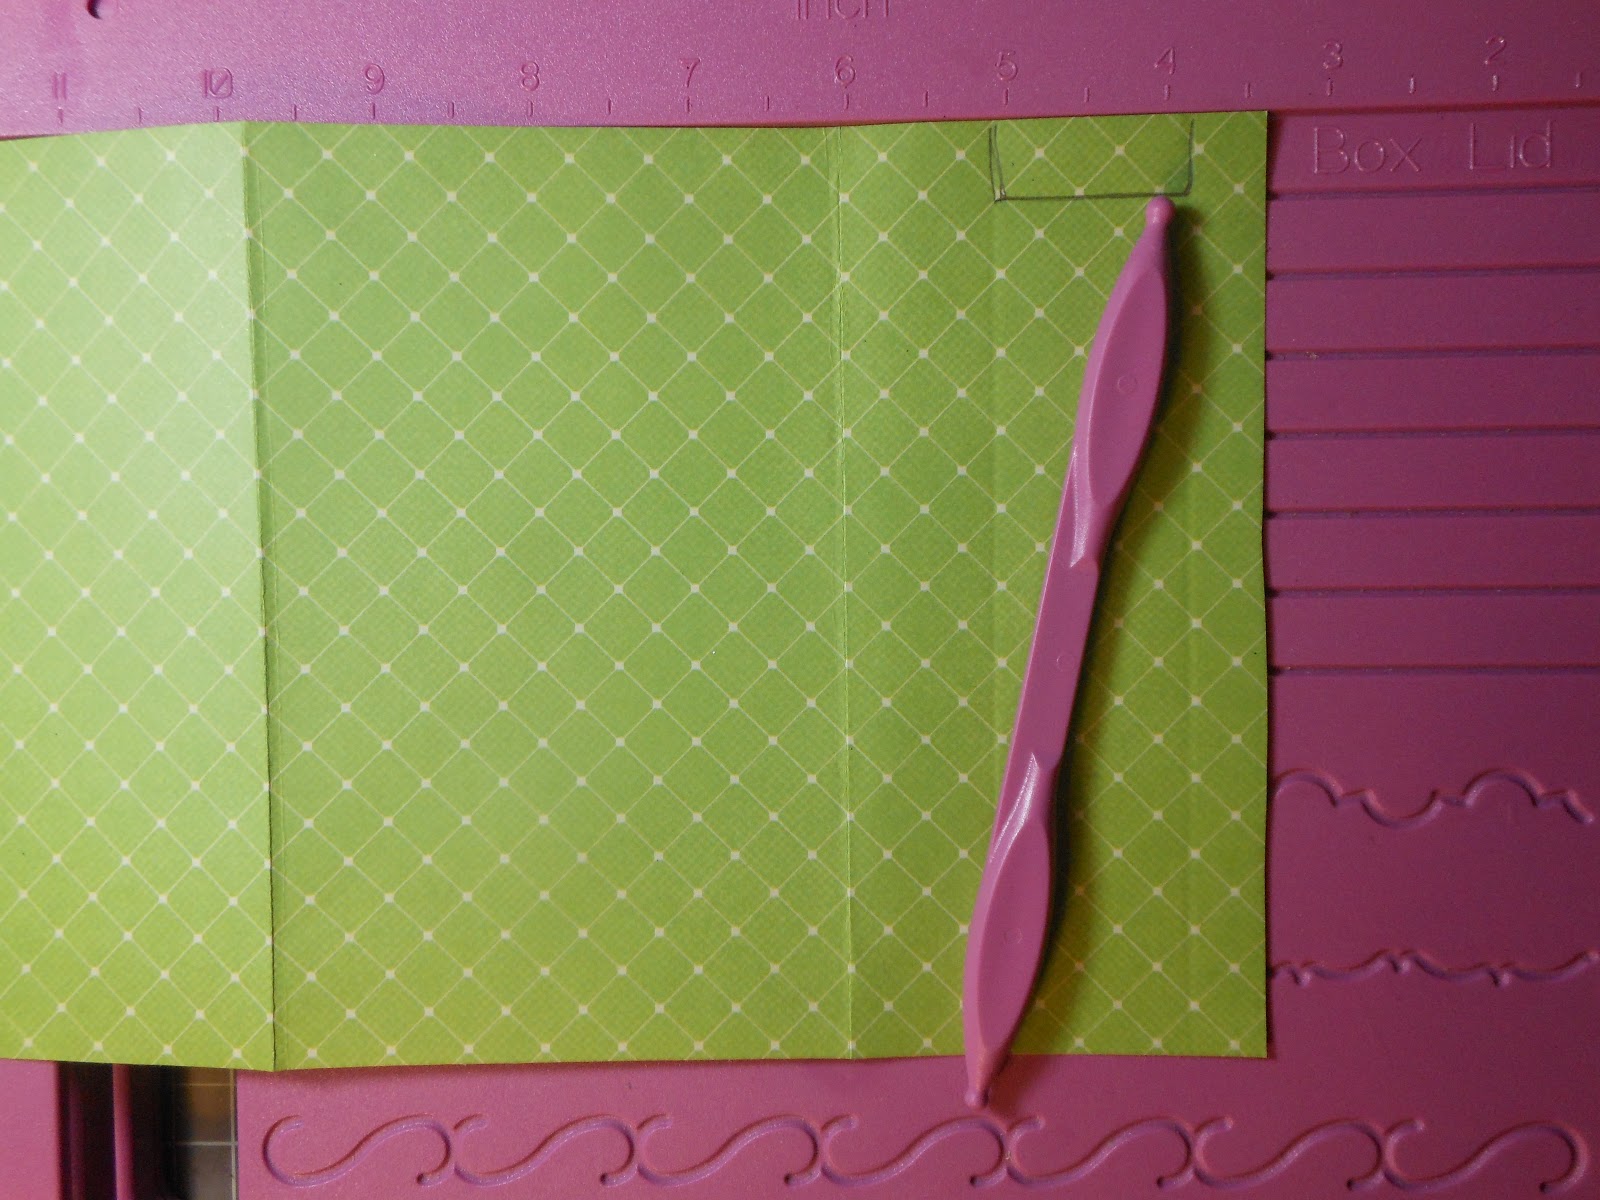
Butt the 6" side of your paper up to the Box Lid side of the board and gently score on the 2nd line. Next carefully cut along your score line.

Butt your paper back up to the box lid side and score on line 1 this time.

Now you will butt the next fold up to the Box Lid side of the board and score on line 2. (Not the fold you just made but the fold you made when you scored on the Trifold US Letter line)

Turn your paper to the 11" side and score on line one between these two folds that you have just made. (You are going to cut out this "notch" for the inner workings of your Pulley Slider card.) Flip over your paper to the opposite 11" side and do this again. Trim out this notch on both ends.
I've marked the notched area in pencil for one end. You will do both sides.


Now find a plastic bag from a store to use to make the inner workings. I used a Target bag. It is best to use a thicker plastic bag and not a recycled bag. You will want the mechanism to hold up. You will cut a piece of bag 11" by 1".

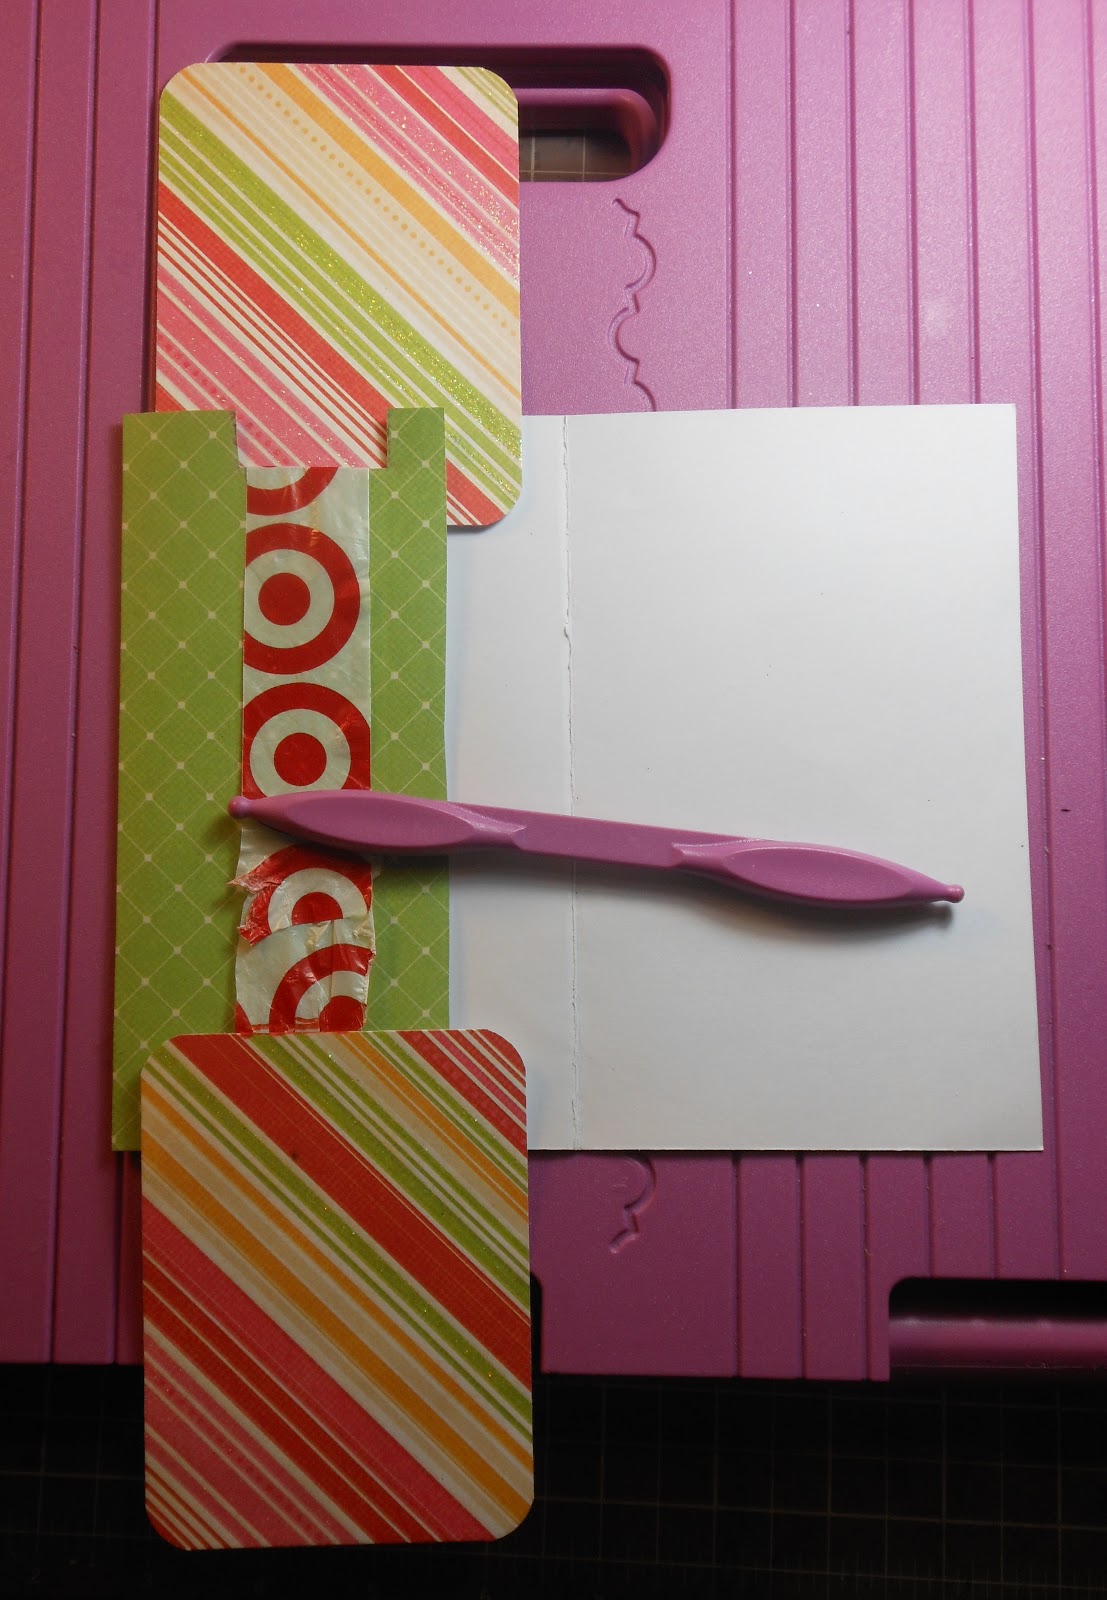
Then you will wrap it around the notched areas and lightly adhere the two ends together with a piece of double sided tape. You will want to have the plastic tight but not too tight since it has to move smoothly inside the card.

Now you will need two pieces of card stock 3" x 4". (I rounded the corners on mine but that is not necessary)

Pull the adhered area of the plastic piece up to the top of the inside of the card.

Then take one of the 3" x 4" paper pieces and line it up along the bottom of the card. I took a pen and marked on the plastic at the top of paper piece. I took away the paper piece and put a piece of double sided tape right below this line. (Don't put tape down the whole thing as this will mess up the movement of your slider piece.)

Add the paper piece on top of the tape. Now open up this flap to the inside and lay the second piece of paper along the top edge. Mark a pen mark on the plastic at the bottom of the paper piece. Remove the paper, add a bit of double sided tape above this line and making sure your paper piece is facing the same direction as the front piece, adhere it down onto the tape.

(You want the pieces to be able to do this)


You will need to punch a hole in the middle of the paper that is on the bottom so you can insert ribbon to use as a pull.


Then you will need to make a half circle along the bottom of the card front in order to be able to see the ribbon pull. If you have the Crafter's Companion embossing board with the bells on it, you can use the large bell as a guide.
Here is the board I am talking about. See the ringer part of the large bell? That is what you would use as a guide.
Line up the front of the card and emboss the half circle. I have traced it in pencil to help you see what I mean. Now just trim it out.


If not you can use a circle punch. Just turn it over and punch out part of a circle, being careful to line it up with the center front of the card.

Finally you need to run a thin strip of double sided tape along the edge and adhere the front of the card down, making sure this tape does not interfere with the workings on the inside.

After watching the video and working step by step with Sara to make my Pulley Slider card base it was time to embellish it. I was super excited to get two new stamp sets in the mail today and I just had to use them! The sets I received were both from Dee Gruenig. One is called Ahhh...Christmas and the other is called Holly Jolly. I totally LOVE them!! If you don't have them you are going to want to add them to your collection.

Normally I color everything with my Spectrum Noir markers but today I decided to step out of my box. I pulled out my Tim Holtz Distress Markers in Barn Door, Peeled Paint and Dusty Concord and colored directly onto my stamp. I didn't worry about the ink drying because after you finish coloring on your stamp, you huff warm air directly onto the colored stamp to reactivate the inks and then stamp them onto your paper. This is cool and really fun to do!  I will definitely be doing this more often.

After I finished stamping the images onto my white paper, I reached for my Tim Holtz Distress Stamp Pad in Antique Linen. Starting off the paper on my craft mat, I worked in small circles onto the stamped images to distress the paper. I really wanted them to match better with the G45-Nutcracker Sweet patterned papers I used to make my Pulley Slider card.


I adhered these stamped pieces to my base card. I used double sided adhesive squares to raise up the image on the front of the card for dimension but glued the ones on the inside down flat. I didn't want to accidentally interfere with the workings of the slider.

In my stash I had a gorgeous wooden scroll piece of holly that I thought would be perfect on this card. I used my Tim Holtz Distress Markers to color it using the same colors as the stamped images. I also added a bit of Copic Opaque white to the berries for highlight. To finish up my card, I added some ribbon to the bottom to use as a pull and glued down some Watermelon colored Skittles from my stash on top of the ribbon. The last thing to do was to add a bit of extra sparkle using my Star Dust Stickles. I'm a firm believer in added sparkle!

There you have it! It took about a 1000 times longer to take photos and upload them for this tutorial than it took to make two of these cards! LOL   Ready to go make one yourself now?


Until next time...happy scrapping!

Wednesday, December 12, 2012

3rd Post in 3 Days!!

Happy Wednesday!  Can you believe I am posting 3 days in a row?!  ha  Amazing right?

I made a couple of  C&S cards yesterday that I wanted to share with you.  These are extremely C&S.


Here is the first one.  I started with a Kraft card base and stamped out my sentiment with VersaMark ink.  Next I heat embossed it with opaque white embossing powder.  I opened the card and cut a small slit on the fold and threaded some pink twine through and knotted it on the front.  To finish up I pulled out some super cute Doodlebug design Santa's Workshop stickers.  I used some pop dots to  raise the snowman and snowlady up off the page and give a little extra dimension to the card.  There you go...done.


For my second card I did the same thing, I started with a Kraft card base.  Next I stamped a scallop across the middle of the card with my VersaMark ink and heat embossed it with red glitter embossing powder.  I stamped out my sentiment and used white embossing powder on it.  I'm not loving how it turned out.  The sentiment isn't as clear as I would like it to be but what can you do?  It will work.

After the stamping I pulled out some red bakers twine and wrapped it around the card and knotted it in the front and pull a super cute Santa Sticker off that Doodlebug Design Santa's Workshop sticker sheet.  Again I used pop dots to raise the sticker up off the base card.  Easy peasy.

I am entering these cards in a few challenges:

The Perfect Sentiment -anything goes Christmas
Paper Playtime - Christmas Colors
Pretty Little Ribbon Shop Blog - It's Christmas!
The Cutie Pie Challenge blog - Christmas

My computer is acting up so I'm going to go ahead and post this while I can.  Thanks for looking!!

Until next time...happy scrapping!!