Wednesday, January 30, 2013

Inspired to Scrap

Hi guys,

I was able to send off 4 of my kids to school today so only one left at home ill.  And I am taking her to the doctor this afternoon.  I just want to check to make sure that there isn't something else I need to be doing to get her well.  But 4 out of 5 is good right?! lol

For some reason I have been inspired to clean my scrap room!!!!!!  I know, I know....crazy right?  You personally probably couldn't tell that I have been cleaning all morning but I am feeling lighter and lighter.  I bet when I am done I will be totally inspired to scrap next! (but I will probably be too tired to do it! LOL :-O)  Anyway, that is what I have been doing this morning mostly.  But just now I remembered that I said I would post the two layouts that I made this week on here today.  So here I am to do that for your viewing pleasure. ha

For those who aren't following along regularly, my New Years resolution was to make more layouts this year.  I've gotten pretty slack about making them and want to get back to it since it is one of my favorite things to do.  SO, on the site Colorful Creations I found a fun challenge called So You Think You Can Scrap

Everyone had to all sign up in advance to participate so it is too late for you to join in this time.  Each week there is a challenge posted and you have one week to complete the challenge.  Each week people are either dropping out or being kicked off for not following the challenge rules.

Eventually it will be whittled down to 1 person who will win.  I have no idea what the winner will win.  Isn't that funny.  I'm doing it just to be challenged to make a layout each week!  ha   And I've
already made it to week 4. (Woot!) 

This week the challenge was especially challenging.  Seriously.  There is a color challenge, combined with a sketch challenge and then you have to have 1 die cut (very specific kind) and can only use embellies off a small list and only use one of them etc etc etc etc.   For those interested in seeing the whole list of challenge rules you can go HERE to see them.


Here is the first layout I made for the SYTYCS challenge #4.

 
Notice I said it is the first layout I made for this challenge...  After I made it I got to second guessing myself.  The rules are very rigid and you have to sink or swim on your own interpretation of them.  So on this one I was worried that I would not get passed on to next weeks challenge because I used a Lucky 8 punch to make my circles instead of a die cut. 


So I added that little heart which is definitely a die cut but not really what they want. (they want the circle to be a die cut) AND I fussy cut the key out of the paper so technically it is just paper but they might think it is an extra embellie and since I chose flowers as my embellie THAT might get me disqualified.  ANYWAY after stressing over it for a day and night.  (stupid right?)  I decided to make another one!  (See! They are inspiring me to make 2 (!) layouts this week!! LOL) 


I'm hopeful that this one will pass inspection and get me to round 5.  Fingers crossed. 


For this one I found a Nikki Sivils circle die cut and turned it over and used the white backside.  I had another Nikki Sivils circle die cut that looked like a record so I cut out the black center and adhered it on top of the white backside of the other die cut.  (our color palette is black, white, cream and grey ONLY)  My base card stock is grey.  I matted my b/w photos on cream patterned paper from Authentique - Lovely collection. And then matted them again on black card stock.  The other two black and white papers are from the Bo Bunny - Enchanted collection.
 
I decided to pick "bling" as my embellie on this layout and only used bling - nothing else.  And I picked a single word for my title since that is how it was on the sketch and the rules were to make it as similar to the sketch as possible.  Wish me luck!! lol   I will let you know if I make it to round 5 on Friday. 
 
I didn't take very good photos of these layouts - sorry.  They look much prettier in person. (even if I do say so myself! lol)  I will try to do better next time. 
 
Okay back to cleaning and organizing...  There might even be a photo of a clean (better than now anyway) room to share. :-)
 
Until next time...happy scrapping!
 
Stacy

Tuesday, January 29, 2013

Fun CAS Cards To Share

Hi everyone!  Oddly since I have a house of sick kids, I've able to scrap a bit.  Maybe because they have all sleeping so much. :-O  Anyway, I have been on a CAS (clean and simple) card making kick.  And some of the new stamps from Crafters Companion's Stamp It Australia -Imagine collection and the new Sheena Douglass - A Little Bit Sketchy collection have some really great sentiment stamps that work perfectly for this type of card.

I have 3 (yes, I said 3!!) cards to show you.  The first one is a nice card using Sheena's A Little Bit Sketchy EZMount Stamp Set - Only Words - Through The Rain.  I wanted to go with just an all black and white theme.  I started with a white card stock base.  Next I cut out a piece of black card stock just slightly smaller than the base card.  Then I grabbed the white card stock again and my Tuxedo Black Memento ink and stamped out the sentiment.  After trimming it to be slightly smaller than the piece of black card stock, I rounded all the corners on all the layers.


I adhered the sentiment layer on top of the black layer and then wrapped some black bakers twine around it.  I tied the twine in a knot and trimmed it.

I stamped out the sentiment once again and fussy cut the umbrella out and using double sided adhesive squares adhered it to the top of the stamped sentiment.  It is always great to do this to give a little added interest and dimension to a card.

To finish I used the same double sided adhesive squares to adhere the black and white topper to the card base.  And voila...it is done.
 

Wow, all that description seems like it took forever to make this card but it went together really very quickly.

On these next two cards I used a similar technique of stamping on the card base and then masking a topper and cutting out the space for the sentiment to show through. This is a very easy technique that I learned in a class at Onlinecardclasses.com.

My next card also uses a Sheena - A Little Bit Sketchy stamp.  This one uses Sheena's A Little Bit Sketchy EZMount Stamp Set - Only Words - From The Heart. 


First I made my card base.  Next I cut a piece of card stock slightly smaller that the base.  Then I laid a mask on the top and sprayed Glimmer Mist lightly over it.  Now you just have to let it dry.  While mine was drying I got out an edge punch and punched along the edge of some green card stock.  Then I stamped and heat embossed a sentiment and trimmed it to the exact width of the topper.  This piece will be going directly under the opening I create when I trim out the space for the main sentiment.


After the topper was dry, I stamped out my sentiment on it in the place I want it to be on the card. This will be trimmed off.  It is just to help you know where to trim your paper.  After you stamp it, then cut along the top of it and the bottom.  Then place these two piece where you want them on your card, and using a pencil lightly mark along the inside edges.  Now take the two pieces off the base card and stamp your sentiment between the pencil drawn lines.  Erase your pencil marks.  Pull out some double sided adhesive squares and adhere the two masked pieces to your card.  Adhere the green sentiment on top of the bottom masked piece directly under the main sentiment.  I finished up by drawing some stitching lines in black marker.


This next card is made exactly the same except instead of cutting the middle out of the card I used a die to cut an oval along the side.  I masked the topper and stamped the sentiment where I wanted it on the card. Then I used my oval die to cut the sentiment off the topper.  Then placed the topper on the base card and using my pencil traced along the inside edge of the oval.  Take off the topper and stamp the sentiment inside the oval and erase pencil marks.  Adhere topper to base card with double sided adhesive squares for dimension. 

To finish up this one I stamped and heat embossed another small sentiment in green and trimmed it like a flag.  I glued it across the bottom of the oval.  And then with a red marker, I made a line of faux stitching around the oval.


The main sentiment is from Stamp-It Australia EZMount Stamp Set 60 - Friendship Sentiments.  I am finding a million uses for these Stamp It Australia Imagine stamps!  Don't tell my hubby but I had to get them ALL! ha

So here are all my CAS cards for today.  I actually had time to make two layouts too (!) but I'm sure you are tired of being here by now so I will share them tomorrow.  Thanks for stopping and looking.

Until next time...happy scrapping!

Stacy

Saturday, January 26, 2013

My Sweet Kids

I have a layout to share that I made using a couple of photos of my kids in their pajamas.  It started off as just a photo of the kids in footy pajamas but then the other two kids crashed the photography session so we let them be in a couple of pics too! ha 


I started off with a sketch from Colorful Creations - So You Think You Can Scrap Challenge #3.  I grabbed a piece of Kraft paper for my base and then I pulled out some paper from the Authentique - Lovely collection.  I have a sweet Fiskers punch with hearts that I used to punch along the top and bottom edge of one of the papers.  I punched circles and placed them half way behind some of my layered papers to make a scalloped edge.


I made a pinwheel from a piece of my patterned paper and if you don't already know how to make a pinwheel let me give you a mini tutorial because it is super easy.  And it turns out super cute every time.

Start with a square piece of double sided paper.  It doesn't really matter what size square, I think I used one that was 4" x 4".  Just use the size that works with your project.


Next I just folded it corner to corner to find the center which I marked with a pencil.
folding corner to corner to find the center
marked center with pencil


Then I took my scissors and cut in from each corner until I was about a 1/4 inch from the center.


Next I grabbed a cut corner and folded it down into the middle and adhered it with a glue dot. 


Then I went clockwise and grabbed the next cut corner and did the same thing.  I continued around all 4 corners. 


To finish you can glue down a button or attach a brad to the center.  Easy peasy.


Next on my layout I pulled out my new Stamp It Australia Imagine set 62 - Time to Dream that I got from Crafter's Companion.  I LOVE these new Stamp It stamps and the butterflies stamp on this set is probably my favorite stamp. 


I grabbed some vellum because I wanted a light and airy feeling.  I stamped the butterflies out twice in red ink and then fussy cut around them.  Then after layering all the paper pieces on my layout I slipped one stamped image under the top edge and adhered it down on the layout by putting a bit of glue under a few of the butterflies.  I cut part of the stamped image away for the bottom corner since I wanted it to be a bit smaller.  I love the way it creates movement across the page.


To finish up I added some Tim Holtz Washi tape to the 'stem" of the pinwheel flower and then added some on the upper left side for a bit of balance.  I pulled a pink ticket stub, a pink button and some clear bling which I colored with my Spectrum Noir markers to be pink on top.  And then I punched out a tiny heart and glued it down on top of the button.  I added a little Crystal Stickles to the top of the heart for sparkle.


I used one of the stamped butterflies that I had fussy cut and discarded as part of my title work.  I used some double sided adhesive squares to raise it up off the page and drew a little flight trail with a brown marker.


Now since I made the second pinwheel for my little tutorial I just had to make something with it.  Crafter's Companion is sponsoring the CAS-ual Fridays challenge blog and I just wanted to join in the challenge so I made a clean and simple monochromatic card with my pinwheel and I stamped a sentiment from the Mulberry Wood - Friend stamp set


Now the challenge this time is to use ink on your project and I did it in a bit of an unusual way (I hope it counts!).  I pulled out my Spectrum Noir reinker for OR2 and I put a few drops of it onto my craft mat. 


Then I took some Tim Holtz crinkle ribbon and swirled it around in the ink until it took on the color. 
I scrunched up the ribbon and then I used my heat gun to dry it. 


And I also pulled out some clear bling and used the same Spectrum Noir marker (OR2) to custom color them.


The CAS-UAL Fridays CFC87 challenge ends on January 31st at noon EST.  You definitely want to enter because you could win 2 awesome Spectrum Noir marker 6 packs - Red Hues and Pale Hues!


See what I mean?  It is a sweet prize and a fun challenge.  So go get busy scrapping!

***UPDATE***

I decided that I didn't like that large pinwheel on my card so I made a smaller one and changed it out.  Here is it.....what do you think? 

 
It just seems more proportionate now.  What do you think?  I guess I need to make something else with that big pinwheel now!! lol


Thanks for stopping and looking.

Thursday, January 24, 2013

Back from Prima's ArtVenture

Hello!!  I'm back from my fun weekend in Palm Desert.  What a blast!!!  This was such a fantastic trip.  The resort was GORGEOUS, the classes were AWESOME, food was FANTASTIC and we came home with TONS OF GOODIES!!  Go PRIMA!!!

Sunrise from our hotel room balcony.


We were lucky enough to meet Leeza Gibbons and she is a real sweetheart.  Her new collection with Prima is beautiful too.  We were lucky enough to get to work with some of it in one of our classes with Janine Koczwara where I made this picture.  I made the tree out of a paper bag and a ton of glue.  Can we can "messy hands"?! ha  I pretty much had messy hands during the whole weekend.  But that is a good thing!! ha


There were 6 make and takes put on by Charity Wings that we were supposed to get to make during our weekend.  Unfortunately I was only able to make 2 of them because every time we would stop in between classes to try to make one they were either full or there was no one there manning them.  It was kind of frustrating.  My only complaints for the whole trip were the parts handled by Charity Wings.  They were supposed to put on evening crops too and didn't...well they had tables that you could go and work at but nothing else going on at all.

Here is one of the make and takes - a necklace.
 
Here is the recipe book I won.
 

But the two make and takes I was able to make were fun and I got the "kit" of a third one (recipe book) to take home and make.  And it was kind of funny but I won the finished recipe book as a prize so now I will at least know what it is supposed to look like when it is done. ha

Some of my favorite classes were with Anna Dabrowska.  She works in mixed media and we worked on a journal in her classes.  We did the front and back cover and 4 pages inside.

Front cover.
 
Back cover.


Two inside pages (not yet adhered in the journal)
 
Two more inside pages.
 
I have more projects from our weekend to share with you but I will let you absorb all of this first.  I will type up another post with the rest of my projects to share later in the week.  Thanks for stopping by and looking today!!
 
HUGS!
Stacy

Thursday, January 17, 2013

Thank You Carri and I'm Off!

I'm getting super excited because tomorrow I fly to California to go to Prima's Art Venture with Leeza Gibbons in sunny Palm Desert.  WOO HOO!!  My bff, Denise, is picking me up at the airport and then we are driving down from Ontario to the resort.

It is going to be so much fun to have a whole weekend of scrapping/crafting with my bff! Thanks to you my hubby for the awesome birthday present!!! I'm almost packed and ready to go.  Just a few more things to add.  I will try to take photos to share on here next week. 

The classes are all day long from 8am - 10pm with breaks for lunch and dinner.  There are a ton of make and takes and free goodies.  There will be a crop each night with prizes.  And it is set in the gorgeous JW Marriott resort in Palm Desert.  


I hear it is a beautiful place and that there is a ton of things to do there but we will be busy all weekend with scrappy stuff.  Did I mention I CAN'T WAIT!?! lol

(Notice she got photo bombed by her brother! ha)
Switching gears...my dd who had eye surgery last week is doing pretty well and will be going back to school next week.  She is still hating the eye drops but the doctor says she is doing fantastic!  Anyway, she was so excited today because my friend, Carri (from DoubleClick - AKA Abusybee ) and her daughters sent her a card that Carri made.  She was super excited to get mail and did her best to try to tear open the envelope in about 3 seconds flat! ha  The first thing out of her mouth when she saw the card was, "Oh...this is so pretty!" "I love it!".  She wanted me to post a picture of her with her card here on the blog so that everyone could see the wonderful card she got.  Thanks Carri!!!  Your card was a hit!!

See ya later alligator!

Monday, January 14, 2013

Yes, I Think I Can Scrap!

Hello there.  How was your weekend??  Mine was good but pretty busy.  However I did find time to scrap which makes me smile. 

My MIL's house closed and she got her new keys on Friday which was pretty great for her.  She won't move in for a few weeks yet because she is getting it painted inside and some new carpet.  Just to freshen it up.

My older daughter had her two lacrosse games on Saturday and boy howdy was it COLD and windy!  BRRRR  We are having unusually cold weather right now.  I can't wait until it goes back to normal! ha  Today the high is 36 degree F which is a new record for Las Vegas. 

I think my littlest daughter (the one who had eye surgery) overdid it on Friday because she was wiped out on Saturday and feeling poorly.  So we learned our lesson and kept her pretty quiet yesterday.  She seems in good spirits today.  We decided to keep her home from school this week to give her eyes a chance to heal.  We are supposed to keep her quiet which is near impossible to do with a 5 year old.  I was following her around yesterday saying, "stop bouncing, stop bouncing..." lol

Yesterday I worked on a layout for the Crafter's Companion January "Anything but a Card" challenge.  I used the Colorful Creations - So You Think You Can Scrap Challenge #2 sketch as my starting point.  I am in love with the new Crafter's Companion - Stamp It Imagine stamp collection that just launched during CHA so I had to use one of these stamps on my layout.  I stamped out one of the quotes from stamp set 60 onto tissue paper and then used some gel medium to adhere it to my layout.


I painted the gel medium onto the spot on the paper where I wanted the quote to go and then tore the edges around the quote and laid the quote onto the gel medium.

Here it is with the gel medium just painted on top and still wet

 Click on this photo to see how it looks up close.

Then I painted some more gel medium on top.  I used a matte finish gel because I didn't want a shine.  Then I let it dry.  It is cool how it seems like it was always on there.  The tissue paper became almost transparent with the gel medium on top.  LOVE IT!


I pulled out some glass beads that I picked up at a thrift shop for pennies and fussy cut banner pieces from a sheet of patterned paper.  I put down a strip of Glossy Accents on each banner piece and then poured the beads on top.  Then I pressed down gently and put each piece aside to dry. 

I received some stencils for Christmas so I had to use one in a couple of random spots on the layout.  I tried to be subtle by inking over it with an inking tool using a Ranger Distress ink pad in Antique Linen.  I like how the stencil pattern kind of matched my edge punch. 

I inked some chipboard with my Ranger Distress stains in Festive Berries and Salty Ocean.  Salty Ocean wasn't a dark enough blue so I inked it in the red first and then layered the blue on top for a richer, darker blue that matched my layout better.  I left the wooden scroll piece natural because I liked the texture of it.  I made myself a little stick pen by adding a pearl to a regular pearl topped straight pin.  I put a bit of glue on the metal by the head of the pin so that the pearl I added would adhere.  Then I stuffed it behind one of the flowers I added. 

I pulled out an envelope that I had in my stash and made a tag to put inside for hidden journaling.  The photo is of my two older boys at their winter band concert.  They looked so spiffy that I just had to scrap the photo.  I really had fun working on this layout.  There were so many little details to put together.  I hope you like it too.

Okay, enough for right now.  I have to help my kids with their homework.

Friday, January 11, 2013

Georgia's Surgery Report

Georgia made it through her eye surgery yesterday and things went well.  She had surgery for almost 3 hours.  She had a rough time coming out of it and couldn't keep anything down until after 9pm.  She slept propped up on the couch and I slept next to her.  She woke me up around 3am and wouldn't go back to sleep until about 5:30am.  I had to get up at  6:15am and get the other kids ready for school.
Georgia Pre-Op
I took her back to the doctor today for a check up and the doctor was thrilled with her progress so far.  She is already watching TV, playing on my ipad and bopped into the doctors office all cheerful and happy.  They love her over there!

We were blessed that things went well and now we just have to struggle through putting in "the dreaded eye drops".  She has to have eye drops 4 times a day and just has a screaming, crying fit every time.  It is a tiny bit better but not much.  Her eyes are blood red and might stay that way for up to 2 months.  Her tears were red yesterday. 
At lunch today with Daddy.  Put on her "shades" before we left.
Photo I just took before I started to write this. (not bad right?)
Here I had her open her eyes really big.  Her eyes will look cross eyed for about 4-6 weeks and then work into an aligned position.

Today she is back to almost her old self.  We even ate out at lunch with Daddy after the doctor visit and she had her favorite food...beans.  (Mexican restaurant)

Thanks for the well wishes.

I'm hoping to get to scrap this weekend and I will share when I do.  Tomorrow is lacrosse though.  My daughter has two games.

And my mother in law bought a house yesterday (Woot!) and got her keys today.  So we celebrated with her tonight. And plan to go over tomorrow when we get back from the games.  So scrapping will probably be on Sunday.

I hope you are having a great weekend! 

Thursday, January 10, 2013

Wine and Palette

Happy Wednesday!

Before I left for Oklahoma I signed my mother and my friend and I up for a painting class.  When I was in Oklahoma last (before Xmas) my mom and I went to eat at a local restaurant and when we walked in I noticed a room full of people painting.  We asked about it and we both said that it looked like fun.  Then we ate our dinner and left and promptly forgot about it. 
Mom and Keun before class started
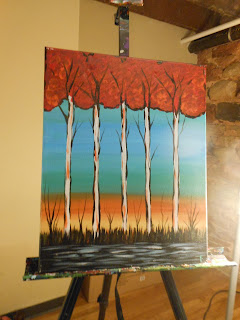
Here is the painting we came to try to learn to paint. (our class example)

Then a while later after I went back home to Nevada I was on Facebook and saw that a friend of mine had posted a photo of herself and another girl painting at a restaurant.  I commented and said that it looked like so much fun and she shot me back the link to the site - Wine and Palette. 
Here is my painting in progress (notice the nice margarita :-) )

They set up in different restaurants around the city and you can go online to their website and find a painting you are interested in trying to paint and sign up to go and paint it.  I decided we needed to do it so I signed up myself, my mom and my friend, Keun.  On December 28th, we drove to Guthrie to Gages Steak House and they had about 30 canvases set up with paint and brushes.  We ordered what we wanted to drink (and/or eat) and then the instructor got us started on our painting.  She took us through it step by step and if we had problems she or one of her assistants would come around and help us figure things out.
Mom and Keun painting their paintings

Here is Mom next to her almost finished painting and you can kind of see Keun's painting next to her.

Here is MY painting.  

It was a blast!!  We all had so much fun and I know that we would do it again in a heart beat.  After we finished up (class took 3 hours) my Mom, Keun and I ate at the restaurant.  It was just the perfect end to the night.  My hubby was out of town working so my brother watched over the kids for me.

Mom and Keun at dinner
Crazy Keun and I 

Have you ever done something like this??  Share.