Saturday, July 13, 2013

Barkley Sneak Peak and Tutorial

Hi there!  Don't tell anyone but I am going to be a bit sneaky and show you something special that isn't out yet but is coming very soon.  SHHHHHH......


I was lucky enough to get a new CD-Rom to play with and it features our newest addition to Crafter's Companion collection...Barkley!  Total adorableness! (yes, I know that isn't a word but it should be!!! ha) (wait...maybe it is a word since it didn't get corrected by spell check!! ha)

Just wait until you can get your hands on the fantastic stamps or the awesome CD-Rom which is FULL of so much scrappy goodness you will be crafting forever!  ha

I decided to play with the CD-Rom first and let you follow along.  I made an Exploding Birthday Box.


First I printed out the 3 pages of the Exploding box
 
Then I cut out all the pieces.  I did this while watching TV and it went really quickly.
 
I went ahead and put the lid together first since it was going to be quick and easy.  I pulled out my Ultimate Tool and scored the edges.  Next I flipped it over and put some glue on the 4 tabs.
 
See the glue on the tabs?  This is the top of the lid.
 
I fold it and then I used paper clips to hold the sides together while the glue dried.
 
 
I inked the edges of the topper I had already trimmed out and then glued it down to the top of the lid.  To finish off the lid, I trimmed out a small tag and then stamped out a sentiment from one of the Barkley stamp sets.  I added it to the top of the tag and finished it off with a small flower.  I glued this to the top corner of the lid. 


Now let's make the Exploding Box...  This is so easy once you have all the parts trimmed out.  First I used my Ultimate Tool and scored the sides.  Then I inked the edges of the coordinating squares and adhered them to all three sizes of the box shape.
 
Inking edges
 
Adhering squares.
 

Adhered inked squares to the back of the scored box shape.
 
Now I glued each graduating box shape on top of each other starting with the medium size one onto the large size and then the small one on the medium one.  I added a few flowers to some of the sides with double sided adhesive circles.
 
I finished up the box by printing out a sentiment sheet and trimming one of the sentiments to fit in the center of the box. 
 
Here is what it looks like when you bring up the sides of the box and put the lid on them.  When you take off the lid, this is what it looks like:
 
 
Thanks for stopping by today and following along.  I know you have to be as in love with Barkley as I am so keep your eyes peeled for his launch in the Crafter's Companion store on July 17th.  Until next time...happy scrapping!!
 
Stacy


Sunday, July 7, 2013

Miss Me?

Hello! Did you miss me?!
Hoover Dam
 

I'm in Oklahoma visiting after being on the road for almost two weeks.  My mother and I loaded up 4 of my kids, my two dogs and hit the road in my RV.  We visted the Hoover Dam, the Grand Canyon, Meteor Crater, the Lowell Observatory, the Petrified Forest and the Painted Desert and many other places along I-40 on the way from Nevada to Oklahoma.  We had a blast!

Lake Mead Recreation Area in front of our RV parking spot.
 

Train to Grand Canyon

Grand Canyon
 
Meteor Crater
 
My silly son, Jesse.
 
The Super Moon
 
The kids riding banana bikes.


It is a little harder to find time to scrap here because we are so busy being social! ha  But I did manage to squeeze out a little time to make a card to share. 


I borrowed my Mother's eBosser and grabbed my Craftwell embossing folder - Magic Celebration to start.  I used some luscious purple pearlescent card stock as my card base.  This embossing folder makes a tri-fold card. 

I stamped out the Violets from the Sheena's Floral Fantasy EZMount Stamp Set - Violets.  Then I colored them with my Spectrum Noir Markers.  I used LV1, LV2, LV3, DG2, DG3, DG4 and CT3. I trimmed out the colored image and layered it on some green card stock.  And then added it to the front of the card.

I'm loving Liquid Pearls right now.  I know, I know...I'm a little behind the times.... ha  But I've just started using it and I'm on a roll.  I added a bit of Silver Pearl to the top and bottom of the colored image.  And I made a sweet little green velvet bow on my Ultimate Tool to add also.


On the inside of the card, I added some white card stock and then stamped out my sentiment in the center.  I used a stamp from Sheena's A Little Bit Sketchy EZMount Stamp Set - Only Words - From The Heart.  I fussy cut a flower and leaf that I colored with my Spectrum Noir markers from the same Sheena Douglass -Violet's stamp set and added it to the inside near the sentiment.


Tuesday, June 25, 2013

Brambly Hedge Tea For Two

Hello people!  Who's ready for another project from me?  ha  I'm off traveling but before I left I made this sweet card using the new stamps just released today at Crafters' Companion.  These stamps are called Brambly Hedge -Autumn Story and they are so stinking cute!  Here's my "Tea for Two" card:


I stamped out the image and got busy coloring with my Spectrum Noir markers.  I used EB1, EB2, Cr1, CR2, CR3, CR8, BG1, BG3, TB1, TB2, FS4, FS9, GG1, GG2 and TN1.  I wanted to use this pretty floral paper from Graphic 45 so I tried to pull colors from this paper onto my stamped image.  I also have been embossing everything I can get my hands on with my new Embossalicious embossing folders! ha  So of course I had to emboss the mat for the image too with my  6" X 6" Embossalicious Embossing Folder - Lattice.

The flowers were originally white but I colored them with my CR2 to color match them with my card.  I just think that this is one of the best things that you can do with your Spectrum Noir markers!  I find myself buying embellishments in cream or white and color matching them to all my projects.

I know you can't tell it from this card but this collection if full of images with adorable little mice in a variety of settings.  You will want to go check them out at Crafter's Companion.  Thanks for stopping by and looking today.

Wednesday, June 19, 2013

Summer Challenge at Crafter's Companion

Hi everyone!  I wanted to share a layout with you that I made for the Crafter's Companion Summer Challenge that is going on all this month at Crafter's Companion. 

 
This photo was taken just after the last day of school and the kids were pumped to be starting on their summer break.  You can tell by their "Sweet Smiles of Summer"! 

I pulled out my Dear Lizzy Neapolitan paper pad from American Craft.  I distressed the edges of all the papers I was using and inked them with my new Ranger Distress ink pad in Gathered Twigs.  I stitched around the base paper edges with my sewing machine.  I can never actually go in a straight line but I think that just adds a bit of character right? ha


I used an awesome sketch from the challenge at GrandDiva's Creative Corner.  I also made sure that I had the ingredients on my layout for the recipe challenge at Scrappin'n'Happy, washi tape, twine and 3 patterned papers.   And since I used this resist technique I was able to enter it also at Kristi B.:Scrappy Friends technique challenge.

I had the doily left over from another project and thought it would be perfect to stuff under my paper bits.  It was made with my Martha Stewart circle punch that I LOVE.  It is actually only part of a doily but you can't tell that a third of it is missing since that part is under the other papers. 


I wanted to do a Emboss Resist Technique that I have been seeing on projects everywhere lately so I pulled out my Stamp-It Australia EZMount Stamp Set 61 - Sentiment Swirls stamp set, my Ranger Distress ink in Gathered Twigs, VersaMark Ink, some clear embossing powder and got to work.

 
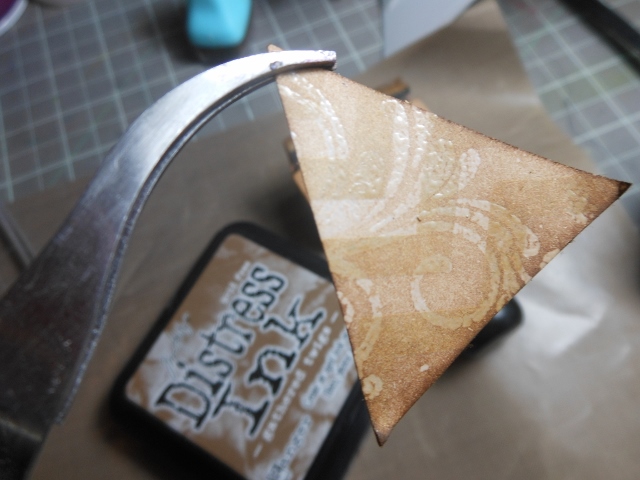
First I trimmed out some of my paper into triangles. I grabbed the swirl stamp and using my VersaMark ink, stamped the swirl randomly on my triangles.  Next I poured some clear embossing powder over the stamped image and tapped off the excess.  Finally I heat it with my heat tool.
 
Here I am heating the embossing powder.


Here is what it looked like after the embossing powder had melted.
 
Now to get the "resist" part of the technique.  I grabbed my distress ink and my inking tool and rubbed ink on the embossed triangles.  I always start inking off the paper on my craft mat and work in circles onto my project.  You can see in the photo how the embossed bits resist the ink. 

Here is what it looks like after the Distress Ink was added.


Here is what it looks like up close on my project
 
This is such an easy and fun technique to try.  And it really makes a big difference in the look of your project.  If you haven't already tried it I hope that I have inspired you to give it a go.  Be sure and check out the June Summer Challenge at Crafter's Companion.  You still have time to enter.  You could win the awesome prize this month so go get busy scrapping!!  Until next time...happy scrapping!
 
Stacy

Tuesday, June 18, 2013

Heartfelt Wishes

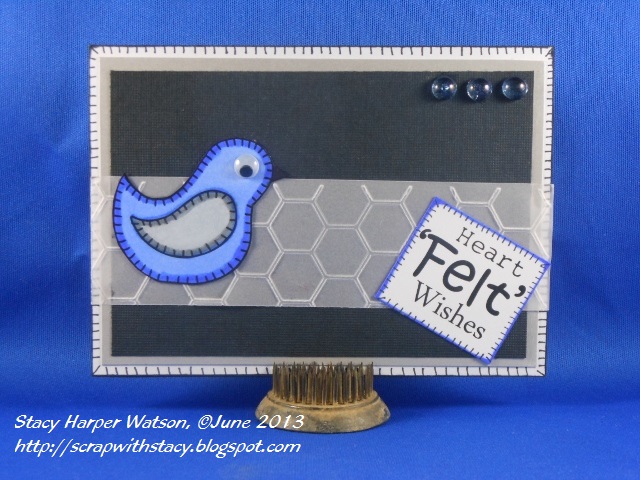
Hi guys,  What's up? Want to see a card that I made using the Sheena Douglass - A Little Bit Festive - Heartfelt Wishes stamps that just came out today!!  Crazy right?  Holiday cards in June!!   Well my card isn't really very Christmasy.  Here, take a look:


See?  I colored the little bird blue thinking I would pull out some of my Christmas papers in blue to use but then I got lazy and didn't want to go look for my holiday papers! (smile)  So I thought I would just use some of the papers that were sitting by my desk and this is what I came up with to share.


I colored the bird with my Spectrum Noir markers in GG1, GG3, TB3 and TB5.  I added a google eye that was sitting on my desk.  See how lazy I was!? lol  

I have been playing around with my embossing folders and my eBosser.  I saw the most gorgeous card using embossed vellum so I was trying out embossing vellum in my eBosser.  I embossed on some vellum using my Darice - 4.25" X 5.75" Embossing Folder - Honeycomb. It was sitting on my desk also so I thought maybe I should use it on this card.  See, now I'm being economical using my scraps!  ha


I think my card turned out kind of cute.  What do you think?  If you like it you should go check out all the other gorgeous new Sheena stamps in this collection at Crafter's Companion.

Thanks for visiting!  Until next time...happy scrapping!

Stacy

Friday, June 14, 2013

Paper Craft Planet Sketch Challenge

Today the Crafter's Companion Design Team is excited to play along with Paper Craft Planet for their weekly sketch challenge and we would love to have you play along too.  Here's the fun sketch and you can find more info on the PCP Blog too!  If you would like to play along, upload your card to the PCP Gallery and tag it with SK061413.


YES ~ there is a prize!!!  For each comment left on the blogs listed below, you will be entered into a drawing for a $20 gift certificate.  ALSO, if you play along on our sketch challenge, you will be entered into the drawing again (just make sure you upload your card to the PCP Gallery with the tag listed above).


Deadline to enter your comments and/or sketch challenge cards is June 21, 2013 at midnight (ET). Entries can be uploaded to the PCP Gallery.
I was pretty happy to make something to share with you.  I immediately knew that I would be using one of my new Embossalicious embossing folders because this sketch just screamed emboss something to me! lol   I used the 6" X 6" Embossalicious Embossing Folder - Floral Frenzy and topped it with a sentiment from Sheena's A Little Bit Sketchy EZMount Stamp Set - Only Words - From The Heart.
.  Here is the card I made:


I'm so happy with how it turned out.  I hope it inspires you to join this challenge too.

Now here's who is playing along today ~ be sure and leave some comments for your chance to win the Crafter's Companion Gift Certificate!
Christiana Reuling -- http://christygetscrafty.blogspot.com/
Stacy Harper-Watson -- http://scrapwithstacy.blogspot.com/  You are here.

Thanks for stopping and looking!  Until next time...happy scrapping!

Stacy H-W

Wednesday, June 12, 2013

A Life Full of Giggles.

Okay ladies, it is that time again that I ask you to look at my layout and if you like it to go vote for me in the Colorful Creations - So You Think You Can Scrap challenge today.  We are down to the last 4 ladies.  Two will be eliminated after voting ends on Thursday.  And then it will be the FINAL week! 

 
I started with some new papers I purchased last week at my LSS from MME - Find Your Wings and Fly collection.  I pulled out one of my new 6" X 6" Embossalicious Embossing Folder - Gun Metal and embossed the paper to mat my photo.  I love the extra texture it gives to my layout. 


These embossing folders are great. They are made of a nice thick plastic and are hinged by two 1 inch pieces of plastic.  This leaves a nice 4 inch opening where you can  run longer pieces of paper through and emboss your own borders or tags.  Another thing I really like is that you can rotate them and have the design going whichever way you like on your paper.  They easily work in most embossing machines.  I've used them in a Cuttlebug, a Big Shot and in my eBosser with fabulous results.  They all produce deep clean impressions without any tearing. (If you run into a tear issue with thicker or coarse card stock you can lightly mist your paper with water and then emboss it.  Your design should now turn out perfectly.
 
Splitcoaststampers has done a product focus on the Embossalicious Embossing Folders.  You should go check it out and see what they have to say about these awesome folders!


I layered papers under the photo for my matting and then I used a doily that I made with my Martha Stewart Circle punch.  You can tell from my previous layouts that I'm obsessing over this Circle punch because there is a doily in pretty much every layout! lol
 
I would love to make it to the final week of the So You Think You Can Scrap challenge so if you have the chance (and if you like my layout).  Please vote.
 
Until next time...happy scrapping!
 
Stacy