Tuesday, December 25, 2012

Merry Christmas From My Family To Yours!!

Merry Christmas from the Watson Family!! 
(If you don't celebrate Christmas then just have a great day!) 
 
 
I know it is a holiday and most folks are spending quality time with their family so I really appreciate that you stopped by to visit today.  I'm going to put up a couple of "oldies but goodies" to help keep you in the mood.  All of my "oldies" were projects made with Crafter's Companion goodies, so as a holiday gift to you, Crafter's Companion is giving away a stamp set on their blog today.  If you are interested in winning the stamp set they are giving away, you can go to Crafter's Companion today and leave a comment on the post for a chance to win.  Please go and leave a comment if you have time.  I would love it if you won something! 
 
Here is a card I made using the Humphrey Xmas EZMount Stamp Set - Christmas Wishes(I just love the colors on this card and of course I love little Humphrey too!!
 
 
Here is the card.
 
Here is a close up look.

Here is the inside.


How about this basket I made using my Sheena Douglas Paint Fusion Holly set?  I stamped and painted the holly and then fussy cut it out.  It just was perfect on this basket project! (and fun to do! ha)
 
Here is the basket.

Here is a close up.
 
There you have it two oldies but goodies that should help to keep you in the holiday spirit!!  Remember to go over to Crafter's Companion right now and leave a comment on the post for your chance to win a stamp set!! 
 
Thanks for stopping by today.  Enjoy the rest of your holiday!!
 
HUGS!!!


Tuesday, December 18, 2012

Who's Interested in a Tutorial?

Hello!! I must admit I am a big admirer of all of the Crafter's Companion instructional DVDs. (Seriously!)   It is just so much fun to follow along with Sara as she walks you through a project step by step. She always makes it pleasure and even when it seems like a project might be complicated, she shows you that you can do it!

For my project today, I pulled out my Ultimate Christmas Project DVD and made a Pulley Slider Card. These cards are really easy to make and super fun. Kids especially love them. Here let me walk you through making one.

You start with a piece of paper 11" x 6" paper. Pull out your Ultimate Tool and butt the 6" side of your paper up against the handle and score in the Trifold US Letter line. Flip your paper and score again in the same line on the opposite side. It will look like this:

Now you will open up your Ultimate Tool to the Box Making board. For this card we are using the Box Lid side of the board.

Butt the 6" side of your paper up to the Box Lid side of the board and gently score on the 2nd line. Next carefully cut along your score line.

Butt your paper back up to the box lid side and score on line 1 this time.

Now you will butt the next fold up to the Box Lid side of the board and score on line 2. (Not the fold you just made but the fold you made when you scored on the Trifold US Letter line)

Turn your paper to the 11" side and score on line one between these two folds that you have just made. (You are going to cut out this "notch" for the inner workings of your Pulley Slider card.) Flip over your paper to the opposite 11" side and do this again. Trim out this notch on both ends.
I've marked the notched area in pencil for one end. You will do both sides.


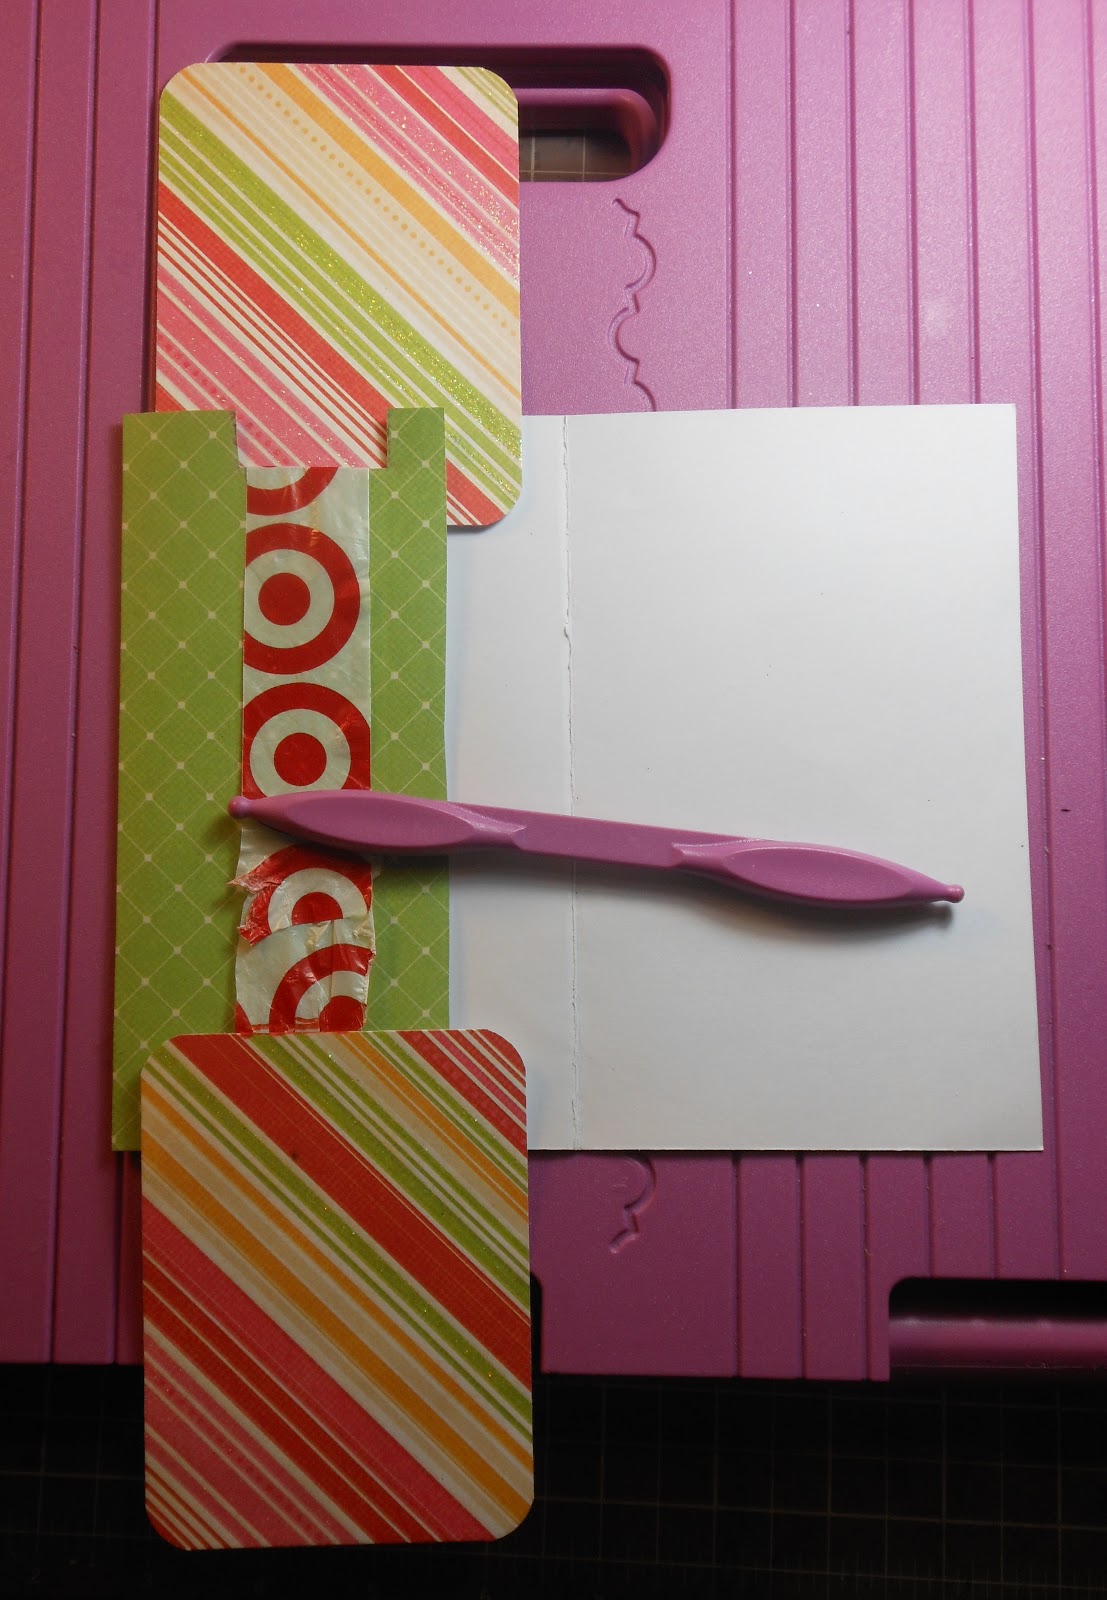
Now find a plastic bag from a store to use to make the inner workings. I used a Target bag. It is best to use a thicker plastic bag and not a recycled bag. You will want the mechanism to hold up. You will cut a piece of bag 11" by 1".

Then you will wrap it around the notched areas and lightly adhere the two ends together with a piece of double sided tape. You will want to have the plastic tight but not too tight since it has to move smoothly inside the card.

Now you will need two pieces of card stock 3" x 4". (I rounded the corners on mine but that is not necessary)

Pull the adhered area of the plastic piece up to the top of the inside of the card.

Then take one of the 3" x 4" paper pieces and line it up along the bottom of the card. I took a pen and marked on the plastic at the top of paper piece. I took away the paper piece and put a piece of double sided tape right below this line. (Don't put tape down the whole thing as this will mess up the movement of your slider piece.)

Add the paper piece on top of the tape. Now open up this flap to the inside and lay the second piece of paper along the top edge. Mark a pen mark on the plastic at the bottom of the paper piece. Remove the paper, add a bit of double sided tape above this line and making sure your paper piece is facing the same direction as the front piece, adhere it down onto the tape.

(You want the pieces to be able to do this)


You will need to punch a hole in the middle of the paper that is on the bottom so you can insert ribbon to use as a pull.


Then you will need to make a half circle along the bottom of the card front in order to be able to see the ribbon pull. If you have the Crafter's Companion embossing board with the bells on it, you can use the large bell as a guide.
Here is the board I am talking about. See the ringer part of the large bell? That is what you would use as a guide.
Line up the front of the card and emboss the half circle. I have traced it in pencil to help you see what I mean. Now just trim it out.


If not you can use a circle punch. Just turn it over and punch out part of a circle, being careful to line it up with the center front of the card.

Finally you need to run a thin strip of double sided tape along the edge and adhere the front of the card down, making sure this tape does not interfere with the workings on the inside.

After watching the video and working step by step with Sara to make my Pulley Slider card base it was time to embellish it. I was super excited to get two new stamp sets in the mail today and I just had to use them! The sets I received were both from Dee Gruenig. One is called Ahhh...Christmas and the other is called Holly Jolly. I totally LOVE them!! If you don't have them you are going to want to add them to your collection.

Normally I color everything with my Spectrum Noir markers but today I decided to step out of my box. I pulled out my Tim Holtz Distress Markers in Barn Door, Peeled Paint and Dusty Concord and colored directly onto my stamp. I didn't worry about the ink drying because after you finish coloring on your stamp, you huff warm air directly onto the colored stamp to reactivate the inks and then stamp them onto your paper. This is cool and really fun to do!  I will definitely be doing this more often.

After I finished stamping the images onto my white paper, I reached for my Tim Holtz Distress Stamp Pad in Antique Linen. Starting off the paper on my craft mat, I worked in small circles onto the stamped images to distress the paper. I really wanted them to match better with the G45-Nutcracker Sweet patterned papers I used to make my Pulley Slider card.


I adhered these stamped pieces to my base card. I used double sided adhesive squares to raise up the image on the front of the card for dimension but glued the ones on the inside down flat. I didn't want to accidentally interfere with the workings of the slider.

In my stash I had a gorgeous wooden scroll piece of holly that I thought would be perfect on this card. I used my Tim Holtz Distress Markers to color it using the same colors as the stamped images. I also added a bit of Copic Opaque white to the berries for highlight. To finish up my card, I added some ribbon to the bottom to use as a pull and glued down some Watermelon colored Skittles from my stash on top of the ribbon. The last thing to do was to add a bit of extra sparkle using my Star Dust Stickles. I'm a firm believer in added sparkle!

There you have it! It took about a 1000 times longer to take photos and upload them for this tutorial than it took to make two of these cards! LOL   Ready to go make one yourself now?


Until next time...happy scrapping!

Wednesday, December 12, 2012

3rd Post in 3 Days!!

Happy Wednesday!  Can you believe I am posting 3 days in a row?!  ha  Amazing right?

I made a couple of  C&S cards yesterday that I wanted to share with you.  These are extremely C&S.


Here is the first one.  I started with a Kraft card base and stamped out my sentiment with VersaMark ink.  Next I heat embossed it with opaque white embossing powder.  I opened the card and cut a small slit on the fold and threaded some pink twine through and knotted it on the front.  To finish up I pulled out some super cute Doodlebug design Santa's Workshop stickers.  I used some pop dots to  raise the snowman and snowlady up off the page and give a little extra dimension to the card.  There you go...done.


For my second card I did the same thing, I started with a Kraft card base.  Next I stamped a scallop across the middle of the card with my VersaMark ink and heat embossed it with red glitter embossing powder.  I stamped out my sentiment and used white embossing powder on it.  I'm not loving how it turned out.  The sentiment isn't as clear as I would like it to be but what can you do?  It will work.

After the stamping I pulled out some red bakers twine and wrapped it around the card and knotted it in the front and pull a super cute Santa Sticker off that Doodlebug Design Santa's Workshop sticker sheet.  Again I used pop dots to raise the sticker up off the base card.  Easy peasy.

I am entering these cards in a few challenges:

The Perfect Sentiment -anything goes Christmas
Paper Playtime - Christmas Colors
Pretty Little Ribbon Shop Blog - It's Christmas!
The Cutie Pie Challenge blog - Christmas

My computer is acting up so I'm going to go ahead and post this while I can.  Thanks for looking!!

Until next time...happy scrapping!!


Tuesday, December 11, 2012

Celebrating

Hello everyone!  My niece is having a birthday soon and I wanted to make her a special card. She adores horses so when I discovered the new SWALK - Champion Stamp set from the new SWALK Pawfect Pals collection I knew it would be the perfect fit!


I stamped out the image on my Ultra Smooth Premium White Cardstock for Alcohol Markers. Then I colored the image with my Spectrum Noir markers. I personalized the images by coloring them to match my niece and her horse. She has a grey appaloosa horse so I added a few spots to the rump and I gave blonde hair and green eyes to the girl.


After coloring the image I fussy cut it out and added some Star Dust Stickles to the green bows and a bit of it to the green stripes in her shirt. I think every card needs a bit of sparkle!


Here are the Spectrum Noir markers I used to color the image.

I recently bought a 6x6 American Crafters paper pad and used the bright and happy colored paper to make this card. I started with some red card stock and then layered some of the coordinating patterned papers until I was happy. Using my eBosser, I die cut some paper to mat the colored image and make it stand out.


I pulled out my Popcorn the Bear - Celebrate stamp set and stamped out the Happy Birthday stamp with VersaMark ink and then sprinkled some opaque white embossing powder and heat set it. Next using my eBosser, I die cut the sentiment out and stapled on a bit of red ribbon from my stash and added some super cute Lettuce green skittles that my friend, Carri at DoubleClick - AKA Abusybee blog made for me. Love them!!  You should go buy yourself some!!!  I finished up with a bit of red bakers twine.


Lately I don't feel the card is finished unless I do a bit of decorating to the inside. So I added some white pearlesent paper. I grabbed a piece of red and yellow paper scraps and cut them in half. I adhered them on top of the white paper. I stamped out another sentiment and the party horns from my Popcorn the Bear - Celebrate set and colored the horns with my Spectrum Noir markers. I used marker colors from the photo above and I also used DR1. And there you have it, an adorable card that I know my niece will LOVE!

I'm entering this in the Willow Sketchie Challenge and at in the Celebrate Challenge at Bunny Zoe's CraftsI'm also joining the Sparkle and Shine challenge at Eureka Stamps and the Red Challenge at Kaboodles Doodles.  I have to also enter in the Red, Green and color of your choice challenge over at Paper Pretties.

I was pretty excited yesterday because I recieved some happy mail!! (and I didn't buy it!! LOL)  My friends, Mike and Holly sent me a personalized calendar from our vacation together to Oregon.  So fun and so thoughtful!!  LOVE IT!


And next my bff, Denise, went totally crazy and sent me a box LOADED with yummy scrappy goodness!!  The photo isn't very good (sorry) and I'm not sure if you can tell but that stack of paper is about 3/4 of an inch thick!!  SO sweet and generous of her!!  LOVE IT!

Thanks for stopping by today and looking. Until next time...happy scrapping!

Monday, December 10, 2012

Crazy Time of Year

Hi guys!  What's up??  Busy getting things ready for the holidays?  I know I am!!  lol  It is going to be a crazy couple of weeks.  We are finally having our "fall".  The leaves have changed color and are starting to drop and the weather has gotten a bit chilly although my kids are still wearing shorts.  They are just adding layers on top to keep warm.  What can I say?  It is just the way the weather goes here in Las Vegas.
Just blurry enough to not work right?  It would have been great if it was clear.

We finally took some photos of our family yesterday trying desperately to get a good shot for our Christmas cards.  Well...not so much...lol   My mother in law graciously offered to take the photos but for some reason she can not take a photo that is not blurry.  So of the ones that were visible there weren't that many to choose from.  AND my little daughter is now back to closing her eyes in EVERY photo.  Oh well, I guess these are the things we scrap about right?  It will be a sweet memory when she is older.

Cute but where are those eyes girl!?
 
Sketches4all has started two December Challenges and they both end on January 3rd.  The first one is the December Eureka/QKR Christmas (Winter Holiday) ChallengeThe challenge to you is a simple one because they know that this is a busy time of the year. All you have to do is make a Christmas (Or your personal Winter Holiday) Themed project. (you are not required to use a stamp on your project.  This challenge is being sponsored by Eureka Stamps and QKR stampede. The lucky challenge winner will receive 5 digital stamps of his/her choice.  
 
The winner will be randomly drawn and announced on January 7th.   Here is the card I made with a cute digi set from Eureka Stamps.
 
outside
inside
 
The second challenge is the December Sketch Challenge.  Even though you are all busy with your holiday preparations, we thought maybe we could tempt you to take just a little break and join in on this SKETCH CHALLENGE with us! There will be two nice prizes up for grabs and the Design Team will pick their favorite first and second place entries. Want to see what the prizes are???

The first place winner will win this:


Nice, huh? The second place winner will receive a $10.00 Gift Certificate from an online store!!

Worth playing for??? It's going to be an easy-peasy challenge. The only rule is that you have to use this sketch cute sketch that design team member - Cheryl made:


You can flip it, you can turn it, you can use your imagination in any way you want to. You don't have to create a layout, either. You can create a card, or anything else that you can think of, using this sketch.

There's no set theme ~ but you can do Christmas/holiday if you want to. Not all of us on the Design Team used Christmas themes, as you'll see with my layout. Our wonderful site owner, Fia, graciously gave each of us a Christmas gift of scrappy goodies (most of us used gift certificates so we bought anything we wanted to! Thanks to you, Fia!! You're the best!!) 
 
The winner will be announced on January 7th. Here is a Halloween layout I made with some Echo Park - Chillingsworth paper that I purchased with my gift card. (I'm a little behind on my holiday scrapping hence the Halloween layout in December! lol) I used some rubon's, stickers and Tim Holtz washi tape too.
 
So two great challenges with fun prizes that you need to fit into your schedules!!  Go and check them out.  I would love to see what you come up with to wow us!! 
 
Okay, that's enough for now.  Thanks for stopping by today and checking things out.  Remember starting in January I will be back sharing more regularly on here.  AND I think it is about time for another giveaway so be keeping a lookout for that coming soon.  

Tuesday, December 4, 2012

Sent with Love

I have been having so much fun getting all my holiday cards made this year. It helps that Crafter's Companion has so many cute holiday stamps sets out to choose from and to have fun coloring. Here is a card I recently made that uses the non-traditional holiday color combo of red and yellow.


I started off by stamping out the Mulberry Wood - Sent with Love image and sentiment onto Ultra Smooth Premium White Card stock for Alcohol Markers. This is the best paper that I have found for these markers. It really just lends to perfect color blending.


After I colored the main image with my Spectrum Noir markers, I used a Spellbinders die to cut out the image with my eBosser. Have you gotten an eBosser yet? I can't say enough good things about mine. I love that it cuts out larger die shapes. And I especially love that it does it so easily. With the easy to follow guide book to help, it is really a piece of cake to layer the plates and feed them into the machine. The eBosser takes over and then all you have to do is scrap with your cut or embossed pieces. Love it!! AND it is back in stock in the Crafter's Companion Store!

After I cut out the image, I layered it with some papers in my stash. I added some pretty red poinsettia flowers and brads. Next, I layered the punched out sentiment onto a matching die cut shape and used some double sided adhesive squares to adhere it to the front of the card. I love the dimension this gives. To finish the outside, I just add a bit of faux stitching with a black marker.


I didn't stop there. I went ahead and finished up the inside also. I added some complementary paper. Then I stamped a sentiment and added some bling from my stash. Easy to do and now it feels finished. What do you think? Like it?

Thanks so much for stopping by and looking. I hope you are having as much fun scrapping as I am. Until next time...happy scrapping!

Thursday, November 29, 2012

I'm Off

Hi guys,

What's up?  I haven't been posting as much as I like to lately but be prepared for lots of scrappy goodness in the new year!  Posting more frequently will be my New Years Resolution, along with "make more layouts".  ha

Today I am working on a mini book for my Aunt.  I promised her last year I would make her one and bring it to our annual xmas party reunion.  (which is this weekend! eek!)  So of course I waited until the last second to get started on it.  (I'm leaving tomorrow morning!!! eek!) 

I did some painting on the pages and cover yesterday and got my base papers down.  I printed photos last night (That was a real pain!!  I need a new printer!)  So today it is the down and dirty part, putting it all together and making it sing!  (well not sing literally, just make it look great! ha)  So I will be working on that today probably up until the last minute knowing me.  ha

This year it is only going to be my dd and myself going to the Annual Reunion/Christmas Party.  Is it bad that I'm kind of excited to not be taking all the kids?!  My dd is pretty easy and so it will feel like a mini vacation.  AND I can spend more time hanging with my cousins instead of monitoring 5 kids...  Bad of me, I know.  Now you know...I'm a bad girl! LMAO


In case you stopped by to see scrappy stuff, I made a card for the November "Favorite Colors" challenge at Crafter's Companion and I thought I would share it with you.  I'm not really sure if it qualifies as "favorite colors" because it seems pretty colorful.  But my thought was that the two main colors were pink and green and those two colors are working for me right now.

(update)  For some reason blogger isn't wanting to let me upload photos and I don't have time to worry about it before I leave so you will just have to wait until I get back to see my project.

Thanks for stopping by to see me today. 

Stacy

Tuesday, November 27, 2012

Special Delivery From Me to You!

Welcome to Crafter's Companion!

I want to start with a question. Do you have the Ultimate Advanced Construction Techniques DVD? I have to admit that I have it and I adore it! Whenever I want to make something a little extra special I pull it out and get to work. That is what I have done today. Here is the set of drawers card I made to share with you.


I started by pulling out my Strawberry Kisses - Special Delivery stamp set. I stamped out the image and one of the sentiments bordered by the ornament stamp on each side. I colored them with my Spectrum Noir markers and then fussy cut the main image out and set it aside.

I cut the sentiment into a rectangle and layered it onto some green and then some red card stock. I added some Glossy Accents to the ornaments and some Star Dust Stickles to the letters. Then I set it aside to dry.


While it was drying I got started on my set of drawers card. This project seems complicated but it really isn't that difficult to make. Why don't I walk you though it? First pull out your Ultimate Tool.


Next you will need to cut two 6" x 6" pieces of doubled card stock. Doubling the paper just makes the set of drawers sturdier. Set these aside for now.


Now to make the inner drawers you need to cut your paper 3 1/2" x 4 3/4". Take your Boxer board and put it between the notches on the Ultimate Tool. Align your paper up to the box lid side of the board (handle side). You will score the paper at 5/8" (5th line in) on all 4 sides of the paper. Next fold and burnish the folds.


You will need to cut a "v" notch at each corner, flip the paper over and add adhesive to the notches. Then you would just fold up each side and tuck in each notch to make a box.


To finish off this drawer you will want to make a drawer liner that will measure approximately 3 1/4" x 2 1/8". And also add a "handle" to the drawer front.


For my project, I cut a piece of card stock slightly smaller that the drawer front and adhered it to the drawer front. Then I added some holly with a berry brad as my handle. You could also use a small flower or a small ribbon bow as your handle. You will need to make 4 of these inner drawers.


Now on to the slider which is the sleeve that the inner drawers fit in. You will work on the box base side of your Boxer board this time. Cut your paper 6 1/4" x 3 1/2". Line the short end of the paper (3 1/2" side) up to the hinge side of the board and score at 5/8" (5th line in). Fold and burnish, then line the folded edge up against the box base edge again and score at 2 1/4" (go to 2 inches and the go two lines past). Fold and burnish and place the folded edge up against the edge again and score at 5/8". Fold and burnish and line the folded edge up one last time. Now score at 2 1/4" again, fold and burnish.

Flip the paper over and put adhesive on the last folded bit. Then you just turn it around and adhere the two ends together to make a sleeve. The inner drawer will slip right inside and fit perfectly. You will need to make 4 of these slider sleeves.

Now to put things all together. Grab one of the 6" x 6" doubled papers to use as your base. Next you will adhere the 4 slider sleeves on top. Next you will adhere the second 6" x 6" paper on top.


To finish things off I made an easel card to adhere to the top of the set of drawers. I layered complementary card stock with some patterned paper from my stash. I used my Martha Stewart corner punch. I added some bling, some word stickers and a vellum embellie from my stash. The last thing I did was use that stamped sentiment that I put aside earlier as my "stopper". I put double sided adhesive squares on the back to make it raise up off the page which provides the perfect edge to hold the card open in the easel position.


I really am happy with how it turned out and I am so glad you stopped by to look. Until next time...happy scrapping.