Wednesday, May 1, 2013

Faerie Poppets -Strawberry Patch

Who would like to get a look at the new Faerie Poppet's stamp collection just out from Crafter's Companion?   Well if you said yes, then you are in luck because I plan to show you a project I just made. 


 Here is a photo of my big and bold Faerie Poppet's project.
 
First I stamped out the FAERIE POPPETS - Strawberry Patch Faerie and my sentiment with Tuxedo Black Memento ink on to my Ultra Smooth Premium White Cardstock and colored her with my Spectrum Noir markers using HB1, CR2, CR4, CR6, CR7, CG1, CG2, CT1, IG1, BGR1 and BGR5.
 
For my base card I pulled out a piece of Luxury Centura Pearl 12" x 12" Printable Snow White Cardstock and a large piece of lace. I taped the lace to the front side of the paper. (shiny side). I love this paper! The shiny side is gorgeous all on it's own and a perfect addition to any project but it is also wonderful to just flip it over and use the non-shiny side for all of your multi-media projects. This paper is a perfect weight and holds up to paints, inks and other wet mediums.  


After the lace was taped down, I sprayed the non-shiny side with Purple Pansy Glimmer Mist.


Here is what it looked like dry after I took off the piece of lace. I took this paper and cut it to 8 1/2" x 8 1/2" and adhered it to my white card base.


I punched out the doily using my Martha Stewart Circle Edge Punch (stop back by tomorrow when I take you step by step through this awesome new product) and cut my colored image into a circle that fit perfectly in the center. Sequins are the "in thing" right now, so I grabbed some purple sequins and outlined the circle with them. This really makes the colored image pop. 
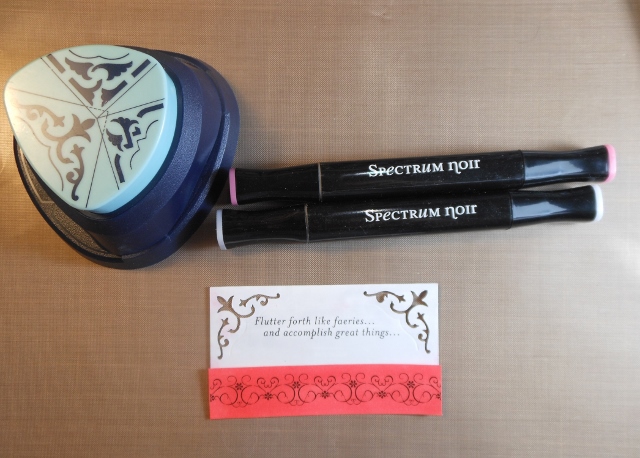

I trimmed my sentiment into a rectangle and used a decorative corner punch. I colored the sentiment with my IG1 and HB1 Spectrum Noir markers. I colored the stamped scroll work with my HB1 and CR6 Spectrum Noir markers. I added some purple sequins to the scroll work for some sparkle.


One thing that I love to do is buy my embellishments in clear or white and then custom color them with my Spectrum Noir markers to match my projects. This is what I did with my flowers. I deliberately went for bold purple highlights using my LV2 marker.


To put together the card, I layered the doily with the image onto my purple lace card base. I tied a red ribbon around the card and adhered my sentiment using double sided adhesive squares to pop it up off the card. To finish I added my brightly colored flowers on two sides of the colored faerie. And there you have it, a great big bold card for a special occasion.   These stamps are available at Crafter's Companion right now.
 
Don't forget we have a new Crafter's Companion "Masculine" Challenge going on now for May.  You could be the lucky winner of the $30 gift certificate to the Crafter's Companion store.  Think of all the goodies you could buy!!!

Thanks for stopping and looking today!!

Until next time...happy scrapping!

Stacy

Tuesday, April 30, 2013

A Note For My Fabulous Mother

Welcome to May!

Here is a sweet card I made using my Frou Frou EZMount™ Stamp - Love Letters.


Sketches4all's May Design Team Challenge is to "Honor a Woman in Your Life".  I think this card I made for my Mom is perfect for this challenge.  Here is the scoop: 

Your challenge, this month, is to create a project "honoring ANY special woman in your life". You can create a layout, card, tag, altered project, etc, as long as it follows this theme and is based on this sketch by Pagemaps:


* Projects must be new as of today, May 1st.
* You can NOT combine challenges.    
* This challenge will close on May 31st at midnight EST.
* The Design Team will vote for their FAVORITE ENTRY and announce the winner on June 2nd.
There is an awesome sponsor:
 
This prize package contains:
Vintage Vogue collection Kit
24 sheets of paper,a package spool buttons,
coordinating ephemera!
 
**Thanks Kelly!**


To make my project, I stamped her out onto Ultra Smooth Premium White Cardstock with Tuxedo Black Memento ink and colored her with my Spectrum Noir markers.

I just layered some patterned paper onto a Kraft card base and added a bit of bling and a flower.  Easy Peasy!  I popped up my sentiments for a bit of extra dimension using double sided adhesive squares.

You should go check out this collection of Frou Frou stamps over at Crafter's Companion.  They are to die for!!

Until next time...happy scrapping!

Stacy


Monday, April 29, 2013

Happy Monday!

Happy Monday!! 

I'm kind of on a roll, well at least for me I am!  Here I am posting two days in a row!! LOL  Okay, pick yourself back up off the floor and check out this layout I made for this weeks Colorful Creations So You Think You Can Scrap Challenge.

Here is the challenge this week:

Use Your Words--NO PHOTO layout

Create a layout centered around a poem. NO PHOTOS. You must use the ENTIRE poem on your page.

You must also have the following on your page:
  • Journaling (this does not include your poem)
  • Memorabilia – Do you have ticket stubs, maps, or newspaper clippings? Now is the time to use them on your layout.
  • Create some sort of pocket to hold your memorabilia, place this on your layout.
  • Twine-use some twine on your layout in some form or fashion
  • Custom Embellishments – Make your own embellishments, ie flowers, washi tape, chipboard pieces, ATC card, etc….YOU MUST NAME your custom embellishment
  • Color Combo: You must also use this color combo ( USE ALL the colors, You may use white, black or kraft as your background)


Here is my layout:

 
I used all the colors required and a white base.  I sprayed and dripped and masked using Peach, Teal and Primrose Color Shine.  I recently bought a 6x6 American Crafter's - Color Crush paper pad at Target that had the perfect colors in it.  Kismet!


I made a hidden pocket behind the poem to stash the Chuck E Cheese's photo memorabilia inside.  I made the little flower and tied some bakers twine around a bit of paper on the lower left side.  And then I journaled all around the edges of the page.
 
 
The bling looks really dark in the photo but it is just a dark teal that is the same as the color chart.  I custom colored some clear cling with one of my Spectrum Noir markers - BT5.
 
The poem I used is Children are a Gift from God by Sandra Tolson.  I edited it slightly by changing the number of "packages" from "3" to "5" because I have 5 kids not 3.  Here is what the poem says:
 
God sent me five packages
That needed special care
"Take care of these tiny gifts
For they are very rare."

"Watch over them with all your love
And let them feel your touch
Take care of their every need
For you are needed very much."

"These gifts will grow up very fast
As you soon will see
Love them with all your heart
And let them be what they will be."

"When these gifts have fully grown
Look at Heaven up above
Know they exist because of God
And all his precious love."
 
I'm surprised at how much I like this layout.  I wasn't sure I would like it without photos but once
I found the Chuck E Cheese's photo to put in the hidden pocket with the perfect color on the edge it all just fell into place.   What do you think??  Like it?  Do you often do layouts without photos?  We are down to just 12 people left participating on this challenge.  At the rate we are going it might take all year to finish it!! LOL I don't care!  I'm just enjoying the challenge of it.
 
I used a sketch from the sketch challenge at Let's Capture Our Memories blog.  (love this sketch!)  I plan to enter this over there too. 


Finally, here is a photo taken by my dd who is 5 years old.  I hope she isn't going to be one of "those" girls who photographs herself all the time!!!  LMBO!!  (jk) 
 
Thanks for visiting today!  Until next time...happy scrapping!
 
Stacy


Sunday, April 28, 2013

With This Ring

Happy Sunday!

How was your weekend??  We were lucky to get to spend Saturday having a family cookout with some visiting cousins.  Kids spent pretty much the whole time swimming in the pool. (They are back out there right now!!)  It has been a super sunny and warm (90s) weekend.  Really beautiful.  It was really fun to hang with the cousins. 

Today my hubby, two older boys and "the cousins" went to see a movie while I stayed home with the other 3 kids and scrapped.  They went to a new theatre near our house that has fancy reclining chairs.  Super cool theatre!!  They were thrilled with the theatre and the movie they saw.

I was lucky to get to finish up a double page layout of photos from my goddaughter, Michelle's wedding.  I'm a little slow since she was married two years ago but what can I say?  lol  I'm really proud of how it turned out.  What do you think?

 
I used my new Martha Stewart Circle Edge Punch to make the doily type circles.  Her wedding colors were black, white and purple.  I had her write up some information and her feelings from the day and I put it on a hidden tag.


I used some Color Shine in Tinsel and Amethyst to spray the wooden letter that I used for the title. And I was happy to use some of my Purple Twilight Skittles from my friend, Carri.  (Get yours here)
 
 
My goddaughter said she liked it so I'm happy!  I'm entering it in the Anything Goes challenge at Creative Inspirations Paints and at Mema's Crafts Anything Goes Challenge.
 
 
I also wanted to share a card that my 5 year daughter made.  She did all of it except I tied on the ribbon she wanted.  I think it is cute!  She used Sheena Douglass A Little Bit Scenic - Flying Colors stamps.  She was thrilled with how it turned out.
 
Thanks for stopping by today and checking things out.  Until next time...happy scrapping!
 
Stacy

Friday, April 26, 2013

Crafter's Companion Friday Giveaway!

Crafter's Companion is back doing weekly giveaways!! YEAH!!  This week you could win the new Diesire  8 x 8 Embossalicious Grande Dots embossing folder.  Double yeah!


Here is a gorgeous card from Edna Taylor for you to drool over!


It's easy to enter: just leave a comment OVER AT CRAFTER'S COMPANION letting them know which Embossalicious folder is your favorite no later than Monday, April 29 at 6:00 PM EST.  (Winners must have a US postal address)
Go on now to the Crafter's Companion Blog and enter to win.!     Good luck, and thanks for stopping by today!

Thursday, April 25, 2013

We WON!

Happy Thursday!


Yesterday my son's lacrosse team had a game and they won it 15-0.  WOOT!  It was very exciting especially since my son scored one of the goals for our team!!  Double WOOT!! lol  Just had to share the news...  They had two games last Saturday and they won them both also.  So hopefully they can keep up the good work!!


Now on to scrappy stuff.  I am loving this card I just made using Sheena's A Little Bit Sketchy EZMount Stamp Set - Only Words - From The Heart and Sheena's A Little Bit Sketchy EZMount Stamp Set - Flower Power.  I really think this collection of stamps from Sheena is spectacular.  I find myself pulling them out and using them over and over and over again.  (As you can probably tell from my projects if you follow my blog! lol) 


I stamped out the sentiment with Memento Paris Dusk ink onto Ultra Smooth Premium White Cardstock and embossed it with clear embossing powder.  I did the same thing with the flower stamp.  However, I did color the flower with my Spectrum Noir markers using CG1, CG2, CT1 and TB5.  After coloring them (I stamped out a few), I fussy cut them out. 


I pulled out my Ultimate Tool (which everyone should have) and made the bi-fold card base with dark blue cardstock. 


I was recently at Target and I couldn't help but look at their tiny collection of scrap goodies.  I found this American Crafter's Dots & Stripes 6x6 paper pad that I just had to have.  I loved how the lime green papers worked so well with the nice dark blue cardstock base.  As you can see this card went together super quickly. I layered the papers on my card base, added the sentiment, adhered the flower with a double sided adhesive square for dimension and then finished up the front by adding a tiny bit of Stardust Stickles to the flowers and a few Lettuce Skittles to a couple of the corners.  (Get your Skittles HERE)


I finished up the inside of the card also using one of the flowers I had made and two of the smaller flowers from Sheena's Flower Power set.  I left an area blank so I could add a personal message when I mailed it.

 
2nd card made with my Party Paws CD-Rom.
 
 When I made the Party Paws card that I posted on Monday, I printed out a second shaped card paper to photograph for my blog post but when I finished up the post it was just sitting there on my scrap desk all cut out and ready to be made into a card.  So of course I had to finish it up!  I printed it out on different paper so it is a little brighter.  I used Ultra Smooth Premium White Cardstock instead of Luxury Centura Pearl Cardstock.     Both worked great and look good but I think I'm liking this one better.  I love the crisp, bright colors.  The LCP cardstock has a pearl finish which is gorgeous but softens the colors a bit.  Tell me what you think.


1st card made with my Party Paws CD-Rom.
 

Well that is enough for now.  I'm working on a double page layout that is almost done so that will be coming soon.  Thanks for stopping and looking today.
 
Until next time...happy scrapping!
 
Stacy 


Monday, April 22, 2013

Party Paws Papercrafting CD

Have you guys tried out the new Papercrafting CD's from Crafter's Companion yet?  I recently bought the new Party Paws stamp set bundle and the CD came with it if you purchased the bundle. 


So yesterday when I was feeling no creativity at all I thought I would check it out in hopes that it would inspire me to scrap.  And boy did it!!!  There is so much on this little CD-ROM!  It is loaded with goodies to get you creating.


I looked and looked (It was easy to get caught up in just looking because there is so much to see!) and then I finally decided to make a shaped card.  This was super quick and easy.  I just pulled up Shaped Cards and picked which one I wanted to make.  Then I decided on the size and printed two copies out onto a piece of Luxury Centura Pearl Printable Snow White Cardstock. 

 
Next I cut out around the printed image of the main card. 

 
Then I trimmed around the bottle and the champagne glass on the second printed sheet.  I adhered these pieces to the first card base with double sided adhesive squares to give dimension to my card.  And then for a bit more fun, I put Glossy Accents on the champagne glass and bubble to give it extra shine.


I pulled out my Ultimate Tool and scored a fold line.  Then I went back to the CD-ROM and pulled up the Sentiments.  I chose two, one for the inside and one for the outside. 


After printing and cutting them out, I inked the edges of one and added it to the inside of my card. 
 
 
I grabbed some ribbon from my stash and my Ultimate Tool and made a bow.  I added this sweet little bow and 3 Meadow colored Skittles to the other sentiment and then adhered it to the front of the card with double sided adhesive squares.  I just love these Skittles that my friend Carri at DoubleClick - AKA Abusybee Blog makes. They come in a ton of fun colors.  You can get some of your very own HERE.
 
 
So there you have it, a super fun, super quick card that took minutes to make.  I'm thinking you should get this CD-Rom for your very own collection.  What do you think?
 
Thanks for visiting today!
 
Until next time...happy scrapping!
 
Stacy